Custom Framing Your Kids Art - 3-D Art in Acrylic
The following is a guest post from Laura Jajko, VP of Marketing at American Frame.
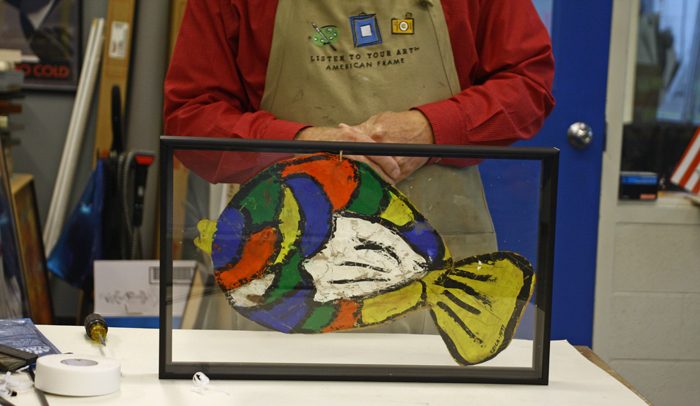
The latest custom framing project that we took on was an interesting one, which required a three dimensional piece of art which was to be protected and displayed between two pieces of acrylic. In this case, it was a paper fish that was brightly painted and lightly stuffed!

The look that the customer wanted to achieve was the appearance that the fish was actually floating between the two pieces of acrylic by hanging it from a piece of string from the top of the frame. Within this tutorial, we will show you exactly how we went about framing this 3D art without having to use a shadow box.
In essence, the technique involved creating a kind of faux shadow box, when all was said and done. To complete the task, we needed the artwork itself, as well as a metal frame, two pieces of acrylic, and some EconoSpace spacers.
The steps that we took were as follows:
- Take the acrylic and peel the protective paper from one side. Wipe the area clean of any dust particles that may have settled onto the acrylic’s surface through the use of an anti-static cleaning brush. Set the artwork, face-up, onto the acrylic.
- Measure (twice) and cut the spacers. Make the cuts for the spacers meant for the long sides first, then make the measurements and the cuts for the spacers for the shorter sides. Cutting the spacers will require scissors, wire cutters, electrician’s pliers, or a Stanley knife.
- Peel the protective paper off the spacers and attach them to the acrylic’s edge. Keep in mind that spacers have a matte side and a shiny side. If you are using a matte frame, place the matte side inward. If you are using a shiny frame, place the shiny side inward. We stacked the spacers three high for this particular project to ensure that the artwork would not be crushed between the two pieces of acrylic. Make certain that you select a frame that will be deep enough for the acrylic, the artwork, and the spacers, combined. The frame rabbet measurements as well as those of the thickness of the framing materials can all be found on our website.
- Once you have stacked all of your spacers, then the outcome will be a kind of faux shadow box. Peel the protective paper backing off the unused piece of acrylic. Don’t forget to use the anti-static brush to clean the surface of dust and other particles. Place the exposed and dusted side of the acrylic down on the spacers stack.
- Since the desired look was to have the artwork hanging from a string at the top of the frame, we made sure to attach the string to the outside of the frame stack. In order to make certain that it was secure, it was taped to the spacers using a piece of linen tape, trimming away the excess.
- The last step was the removal of the remaining paper backings from the back and front of the frame stack. All of the paper should be removed at this point. Give the acrylic a cleaning if It appears that there is any dust or debris on it. Assemble the frame’s three sides and slide the stack into the track that is formed. Set the last piece of the metal frame into place and attach by tightening the backing angles to that final side.
This fun stuff is all that was needed for the three dimensional artwork to be displayed in a faux shadow box and secured into a metal frame.
This post was written by Laura Jajko. Laura is VP of Marketing at AmericanFrame.com, the nation’s leading online source for custom frames, mat board, archival digital printing services and picture framing supplies. For other inspiring picture framing and design ideas, visit her blog, A Good Frame of Mind; and join her on Twitter @laurajajko and Google+.
This is a sponsored post - and I think it’s a great idea.


