blabbery moxywares quilting quilting patterns sewing: boo davis dare to be square deer modern
by Blabby
leave a comment
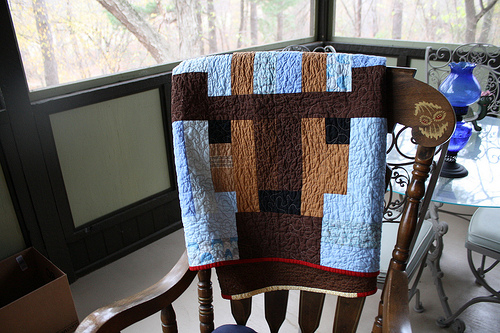
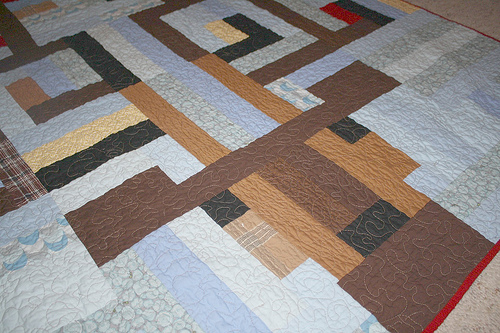
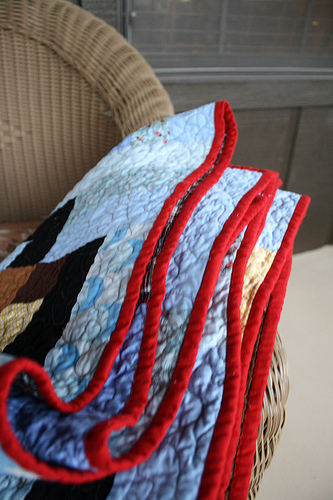
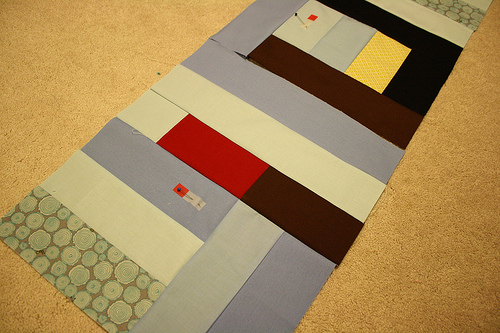
Deer Quilt Complete
This quilt was for my dad’s neighbor who helped build the screened-in porch. When I started it (about 5 months ago) I didn’t realize how Christmasy it was! Now I wish I had made the deer’s nose red. I hope he liked it!
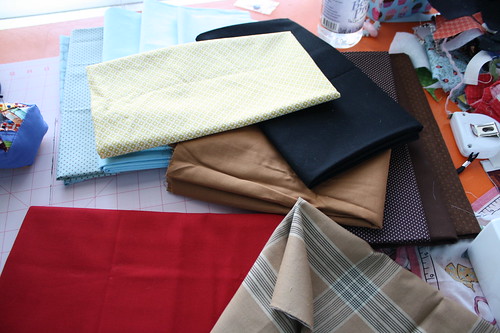
It’s made from a pattern in Dare to Be Square Quilting by Boo Davis. The fabrics are mostly Kona solids with some random blue prints (Lizzy House, Jay McCarrol) and some random plaids. I also got a yard of the brown plaid print for the back from Joanns.
blabbery quilting patterns sewing: boo davis dare to be square quilting deer kona quilt
by Blabby
5 comments
quilts are sew deer to me!
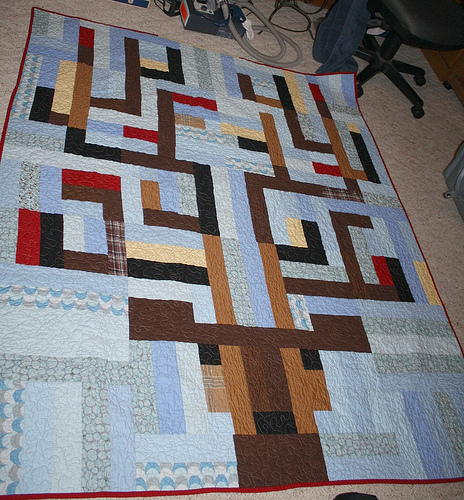
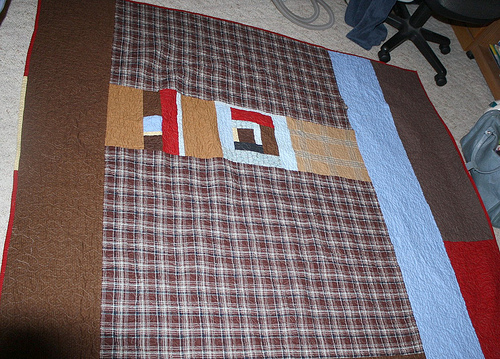
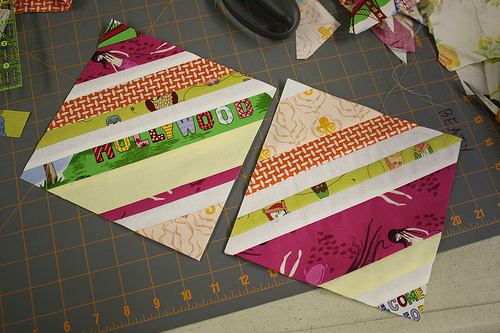
My parents’ super nice neighbor is helping them screen in their second floor porch. My dad has been ‘building that porch’ for about six year. And now, thanks to his neighbor, the porch is almost done after one week of work! So I’m making the neighbor a quilt for his trouble. Him and his wife are marathoners, but I couldn’t think of a good quilt idea that had to do with running. But then my dad told me he’s a hunter! And then I was looking through Boo Davis’s awesome book Dare to be Square Quilting, and found this awesome pattern.
So I picked out my fabric - a mix of kona solids, some of the new yellow print from the DS Quilts line at Joanne’s, and some random blue prints and a brown woven.
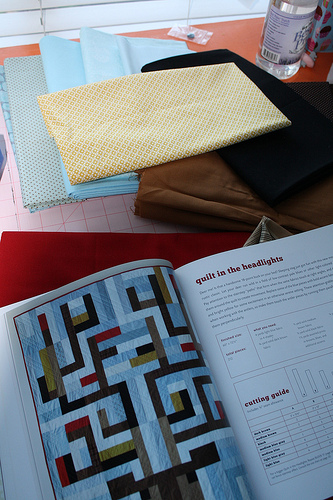
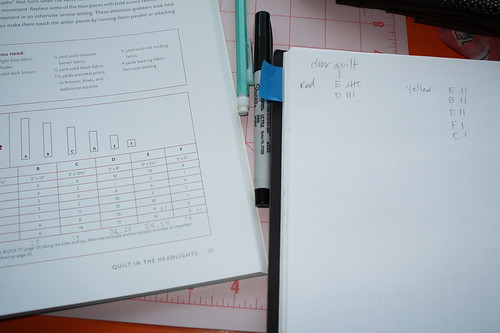
My favorite part of Boo’s quilt is the bits of red and yellow, and they’re not included in the cutting instructions - so I went through her pattern and wrote them in just like she has in the photo and subtracted out the blue pieces they would replace.
It only took about 3.5 hrs to do all the cutting - super easy pattern!
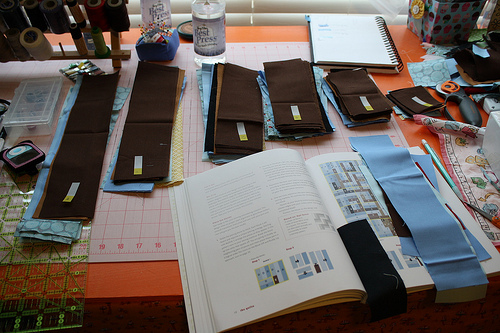
And then in an hour, I knocked out 4 blocks - the top row of the quilt. But it was so late at night, the color of this photo stinks.
More (better) pictures to come! I can’t wait to finish it up. I highly recommend this book.
Bee Happy blabbery books flickr quilting patterns sewing: boo davis elizabeth hartman january modern quilt guild national blood donor month oh fransson project modern
by Blabby
leave a comment
TGIF!
I think Friday is my favorite day of the week. The feeling of joy I get at about 6 pm on a Friday is unmatched by anything else these days.
That was a little bleak.
So anyway, it’s blood donor month. Did you know that? One donation can help up to 3 people! I’ve got my appointment tomorrow morning at 9:45 am. I love having a donor center right around the corner!
 I got two new sewing books burning a hole in my metaphorical sewing pocket. Did I blog about these already? My blogging has been so intermittent…anyway, I’m super excited about them. First off is Elizabeth Hartman’s Practical Guild to Patchwork. Of course, there’s already a big Oh

Fransson group on Flickr - check out some of the projects! Besides the great quilts in her book, I also want to give mod mosaic a try. How cute is that? And everyone posting their pictures say it’s really easy.
My other new book is Dare to Be Square by Boo Davis. Super cute projects - especially the robot. And the weiner dog. Her patterns are totally unique. I love straight lines - she’s got such a fun mix of quilts in this book. AND, she’s a totally awesome illustrator. Check it.
So that’s what I’ll be working on in the near future. That and my outstanding bee blocks and some sweet baby gifts for my new cousin Jackson due in Feb.
Oh! And I almost forgot! I’m going to do Project Modern Challenge #2. I’ve been doing some sketches, but I’m not quite to the sharing stage. Thanks to the awesome Modern Quilt Guild for setting it up! Look at all the super awesome entries from Project Modern: Challenge #1!
Have a great weekend!
Sewing again, Finally!
It’s been a long move. First, our stuff (read: my sewing machine) was in storage for almost 3 months. Then, when I finally found it in one of about 50 boxes labeled “Crafts”, I couldn’t find the power cord!
I’m pretty sure it was wrapped in some packing paper that got put in a packing paper pile that one of the cats thought was a litter box. But that’s a whole other gross issue.
So anyway, my poor Bee Happy bee-mates have been waiting on my personal problems for months now. I just finished up July, Aug and Sept. Whew. Those went in today’s mail, and I feel great about it. Now I just need to finish up Oct, Nov and Jan!
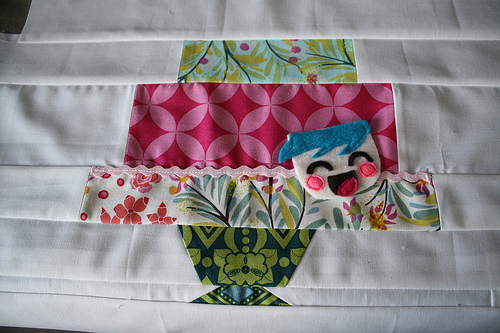
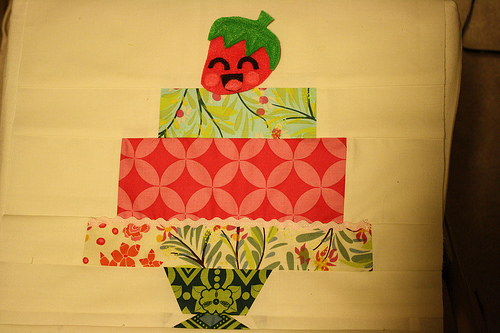
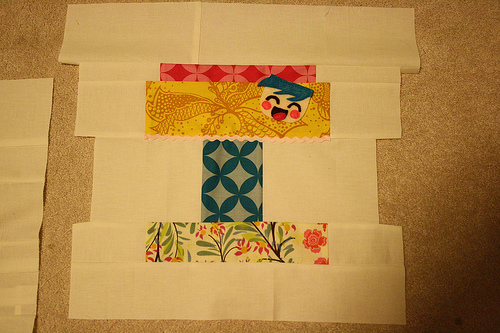
Lori’s blocks - she wanted cakes on cake stands. I jazzed mine up with some silly felt faces. But they’re just pinned on, in case kawaii faces made of felt aren’t her thing.
Next was Marianna’s blocks. She asked for 5 blocks using Oh Fransson’s Mixed Tape pattern. I had enough fabric to make 7. this pattern is so super easy and fast.

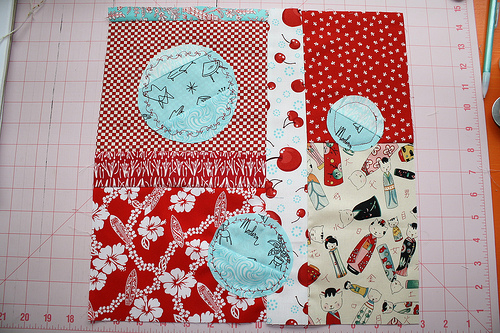
Finally, Melissa asked for two blocks - one with circles of some kind, and one quilter’s choice.
blessings Crafts quilting quilting patterns sewing: LAMQG nine patch
by Blabby
6 comments
LAMQG Saturday Sew
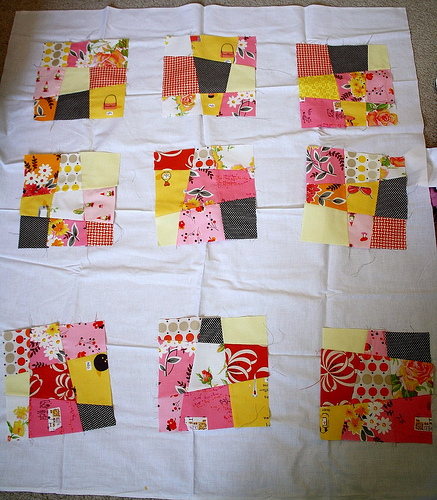
I had a ball sewing with the LA Modern Quilt Guild yesterday at the Saturday Sew. I got all 45 blocks done for my crazy nine patch (thanks to Elizabeth at Oh, Fransson! for the awesome tutorial.)
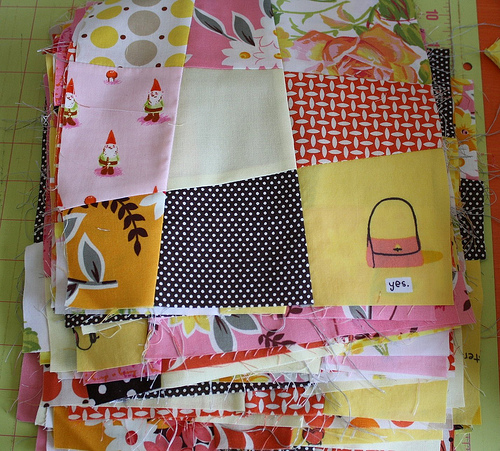
Although, somehow, I managed to mix up the stacks and ended up with two of the same fabrics in a bunch of blocks. I’m still not sure how I managed that.
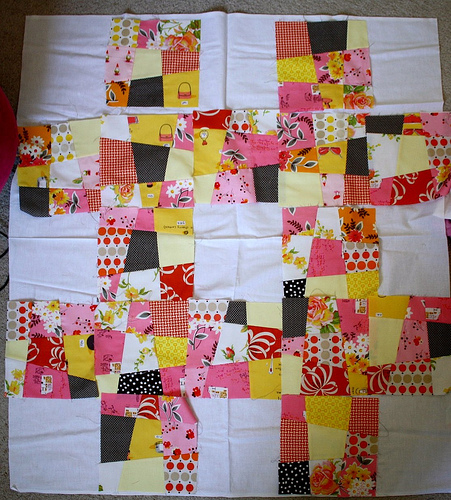
I had planned to forgo the lattice layout and do white sashing instead…to make the quilt bigger and to calm down the craziness of my blocks. But it turns out that they lose most of their charm with the white sashing, so I’m going with the lattice. I also think my mistakes are VERY hard to find in the lattice layout…not that my sister would complain about them anyway. And this is for her. I may still have to add a border to make it a good nap size quilt. We’ll see. What do you think?
With sashing:
Lattice:
I also got a couple of string blocks done for Urban Craft Center’s collaborative Haiti quilts. Thanks again to Latifah for picking up the fabric and instructions so I could participate!
blabbery flickr quilting patterns sewing tutorials: hexagons
by Blabby
51 comments
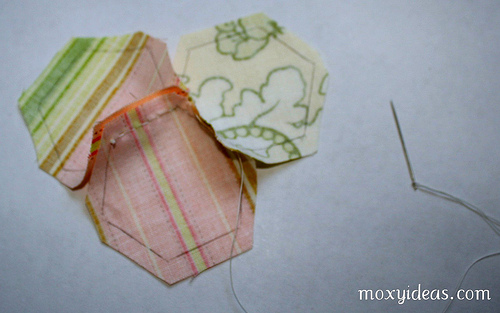
Hand-Sewn Hexagon Tutorial
Here’s my little tutorial for hand-sewing hexagons together without using paper templates inside the hexagon.
First, download the hexagon template you want to use. Cut out your shape - you really only need one or two. (I made the template sheets for people who need lots for English paper-piecing). You can pre-cut your fabric into squares a little larger than your template (at least a 1/2″ on all sides), or just keep your fabric whole. Trace your shape. A lot!
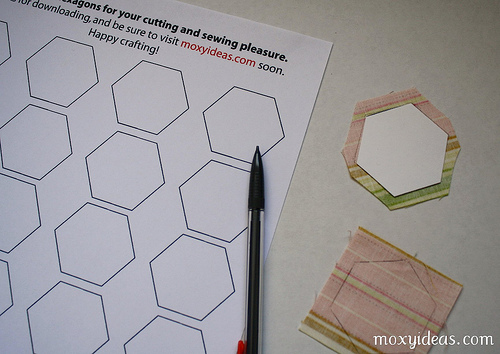
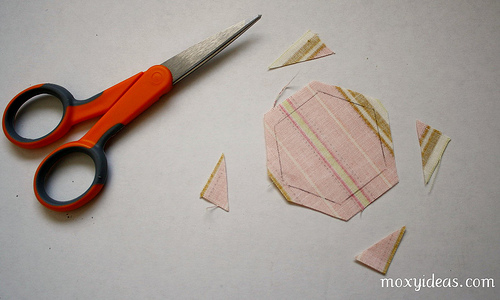
Cut out your hexagons, leaving a good 1/4″ seam allowance all the way around.
Place two trimmed hexagons right sides together and stick pins through two corners. Don’t worry about your outer edges lining up, just get your pencil lines to match. Two pins - one at each end of one side of the hexes - is the easiest way to get a good match.
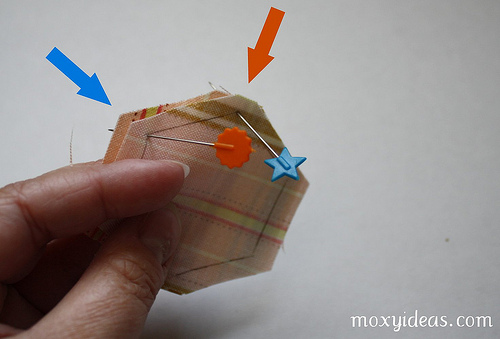
Stick your pins in along the lines away from where you’re going to sew so they’re out of your way. Thread your needle, and put a knot in one end. Use the knot to anchor one more corner together - this will be your starting point. I like to start and stop with a tiny back stitch at each corner when sewing these hexes together, just to make the intersections stronger.
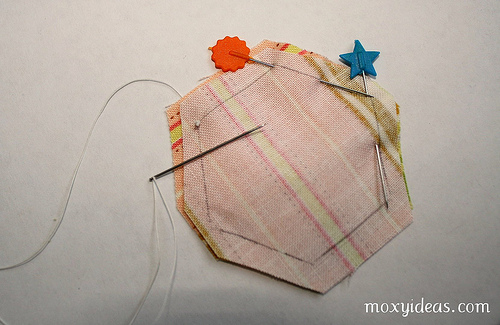
Pushing your needle up and down in a running stitch, sew right along your pencil lines.
As you get to the end of your side, remove the pin to get it out of your way. Sew your running stitch all the way to the next corner. Once there, sew a small back stitch to secure the corner. Be careful not to pull your thread tight - it will gather your hexes. You’ll have to continually loosen the fabric back to a nice flat seam.
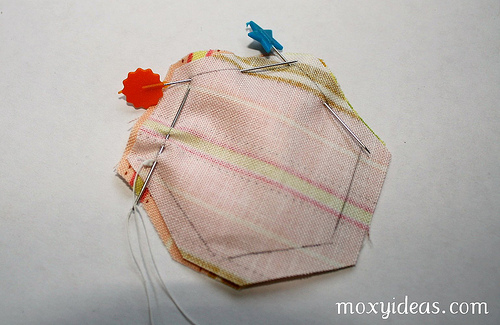
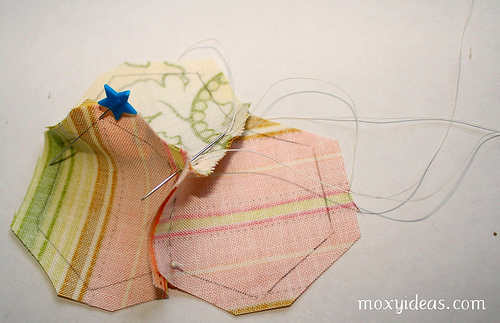
Now you’re ready for a third hexagon. You can add it anywhere, but for this tutorial, I just kept moving to the right. Open your first two hexes and line your third hex up right sides together with your second hex. Use a pin in the corner to keep them lined up.
After a quick back stitch through the second and third hex, to both join them and secure the intersection, continue your running stitch to the next corner.

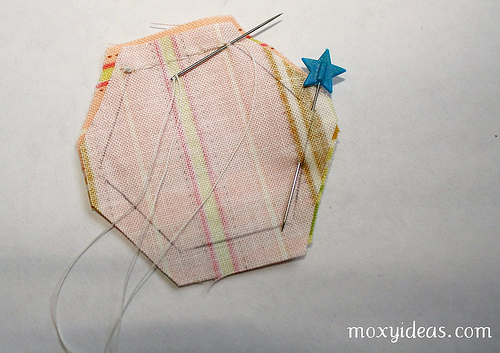
Now you’re at the far right side, and you need to get back to sew hexes one and three together. You can do a back stitch and tie a small knot and cut your thread, or you can do a back stitch and sew a few stitches to run the thread back to the center. I do the latter…it may be laziness, but I try to see how far I can get without ever cutting the thread.
Use the same method of lining up hex one and three, right sides together, and securing the outside corners with a pin. Sew with a running stitch toward your pin.
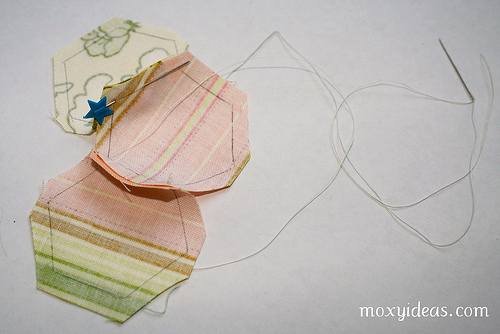
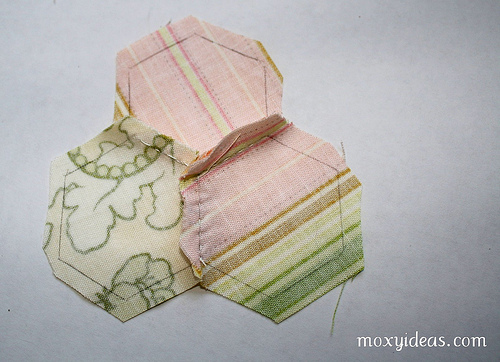
I’ve stopped at three here, but you can just keep adding more and more around, choosing where to place the next one based on where your thread left off. Here’s the back - I’ve finger pressed the seams.
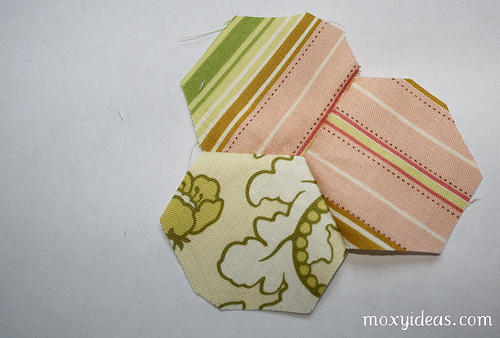
Here’s the front. Once I’ve got all the hexagons I want, I use spray starch to flatten out the seams. Eventually, I’ll also use spray starch to turn the outside edges under, and I applique my hexes down to a foundation. I guess you could just keep going and going until you make a whole quilt, but that is a little ambitious for me.
So that’s it! I hope it helps someone. Sewing these goes super fast - it took ten times as long to write this tutorial as it did to sew those hexes together. I hope you’ll link back to me with pictures of your completed projects!
I feel so cool!

mine

kerry's
I was wandering through all the lovely quilts on Flickr, one of my favorite pastimes, and I ran across a gallery with one of my quilts and another quilt that looks a lot like mine. Kerry over at Freckled Beauties made her lovely strip quilt based on MY DESIGN! Woo hoo!
Here are her blog posts about it with lots of pictures. I particularly like her use of bigger white pieces in the middle - they show up a lot better than on mine.
I was thinking how cool it is that we can share patterns from different countries (she’s in Canada), and how sewing - like anything that brings people together - makes the world so small. It was a thrill to see my design being created by another quilt maker. Maybe I should write down the pattern :)
addictions blabbery Crafts featured quilting quilting patterns sewing shopping: fat quarters shop free spirit garden friends handmade houston jay mccarrol jolly jabber new fabric lines project runway quilting quilting patterns quilts sandy henderson sewing woodland wonderland
by Blabby
3 comments
Houston
I haven’t paid much attention to all the talk of the famed Houston trade-show, the Internatio nal Quilt Market, I’m just patiently waiting for all the great new fabrics and patterns to be available for purchase from my favorite shops. One such shop though, Fat Quarters (awesome selection, reasonable prices, lightening fast shipping), had a ton of great pictures on their Jolly Jabber blog, and I can’t help but wish I was there.
I’m particularly intrigued by Sandy Henderson and Jay McCarroll. Sandy Henderson has some gorgeous fabrics and some fun tutorials on her blog - including one for shirring! Hooray. The picture of her booth on the Jolly Jabber really grabbed my eye - I LOVE those big fabric flowers around the top of the booth.
 You may remember Jay McCarroll from Project Runway…well, in the picture on Jolly Jabber, he’s surrounded by really cool applique quilts. Are they his? He’s also wearing a cool 1970’s string-pieced vest. Is he a quilter? Nothing about quilting or quilts on his site, but you never know…I’m going to research it a little more. Looks like there is a line of fabric on the way…from none other than Free Spirit, my fav. These swatches are from the two lines - one line is called Woodland Wonderland, the other is Garden Friends. I love those trippy little deer and bugs.
Anyway, lots of eye-candy out there. I better start saving my pennies :)
blabbery Crafts fabric featured flickr heather bailey quilting quilting patterns sewing: applique art quilt bijoux Crafts fabric flickr flickr groups heather bailey pop garden quilting quilty raw edge sewing snails swap
by Blabby
4 comments
my mini quilt swap group
I’m in a swap group on flickr for mini quilts. August was the first month I participated, and I made a pretty traditional pattern. By flickr standards, it was a dud. Only one or two comments. This month, with the theme of mushrooms and/or owls, I endeavored to have a much more successful flickr showing. So I decided to try my hand at an art quilt. I drew a little sketch, enlarged it on my scanner, and then cut out templates for raw edge applique. I have a ton of awesome fabrics that I don’t have a plan for, and I decided to cut into my gorgeous collection of Heather Bailey’s Bijoux and Pop Garden…it was actually kind of hard to cut into those pieces. Especially for little things like the snail’s head or the mushroom’s underbelly…it felt very wasteful. But I’m glad I did it! So here’s the result:
Here’s my sketch and and the back of my quilty - which are both pretty boring:
Next post - the awesome quilty I received!
addictions blabbery blessings blogging Crafts quilting quilting patterns sewing: etsy gems on the web inspiration johanna wright red cross quilt sewing
by Blabby
leave a comment
black hole strikes again.
I’m not supposed to still be on the internet. But here’s what happened. I went back to Flickr to check if I had any comments (I did!) and followed a link to a commenter’s photos. This is how it starts. Then, I followed another commenter…and so it goes.
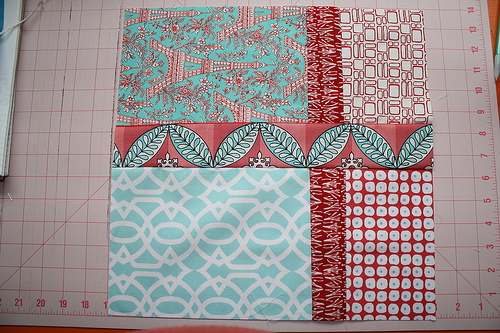
I found this blog, Crazy Mom Quilts, which is FULL of inspiration. Most inspiring - this Red Cross Quilt. I truly love this quilt. I’ve been searching and searching for the most perfect quilt for my sister, and this is it. I’ve been saving blue and aqua fabrics, and it’s going to be perfect.
I also stumbled onto Johanna Wright’s artwork on etsy. Wow. My craft room will not be complete until I have some of her prints - or even better - some of her original paintings. I LOVE her.
Now, I seriously need to get off of here. Now that I’ve saved those links for myself, I can go do something else. Like sew. Or drink coffee.