blessings Crafts flickr quilting sewing: craft room diy houndstooth ironing board
by Blabby
2 comments
Craft Room: New storage!
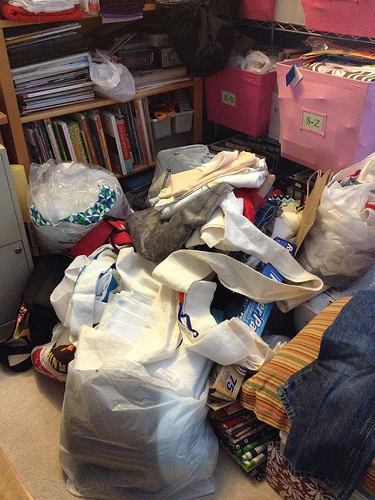
There’s a corner of my office/sewing room that is getting a little Hoarder-y. I’ve finished a couple quilts lately and kind of thrown all the cut away batting/scraps on top of this bin. And then I bought some fleece and felt for doll construction and some wovens for scarves and some vintage table cloths and I think you’re getting the picture. That pile is getting CRAZY.
So we got this pretty dresser this weekend. It was brand new - possibly the 2nd brand new dresser I’ve ever bought in my life. I don’t know what came over me! But there we were, in the pretty princess little girls section of Rooms To Go, and the sparkly knobs were just calling my name.
It was right next to the Cinderella carriage bed with the sparkly netting. Do you know what I’m talking about?
So here it is (imagine angels singing):

When I started the dresser search, I went to Goodwill first. They pretty much never have any good furniture at our Goodwill, but I wanted to try. So of course, they didn’t have any good furniture, but they did have a roll of home dec-weight pink and brown houndstooth fabric for $10! I can see the original Hancock’s tag inside that says it was originally $17+ a yard. There are at least 5 or 6 yards on this roll!!! SCORE! Who knows what I’ll use it for - at this price, I might use some of it as stabilizer! Who cares?!
So with my new houndstooth, I have the perfect canvas to make my own ironing board to top whatever dresser I find.
So we got the dreamy dresser, and I got some 3/4″ plywood at Home Depot cut to the right size and my handy staple gun out…
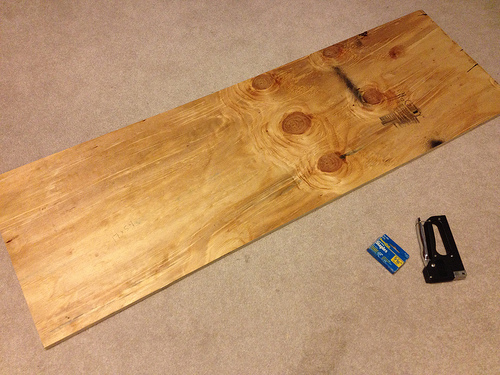
And 4 layers of cotton batting and one layer of insul-bright and one layer of bargain basement houndstooth later, and I have an AMAZE-BALLS new storage dresser and ironing board!
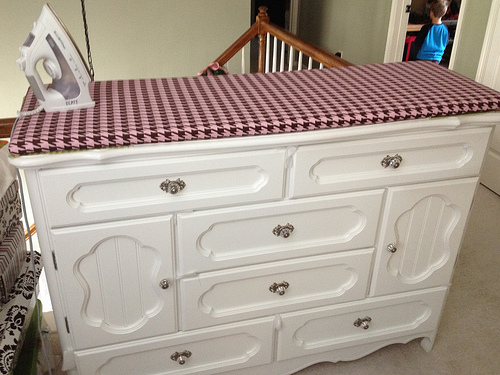
Can you tell I’m excited?
Handmade Holiday part 2
I finished up a few more gifts and sadly, forgot to take pictures of a bunch of them! Lots of pouchies for neighbor and teacher gifts, and of course, I didn’t take any pictures. But I used this super cute and simple pattern: The Pleated Zipper Pouch from SkipToMyLou.org
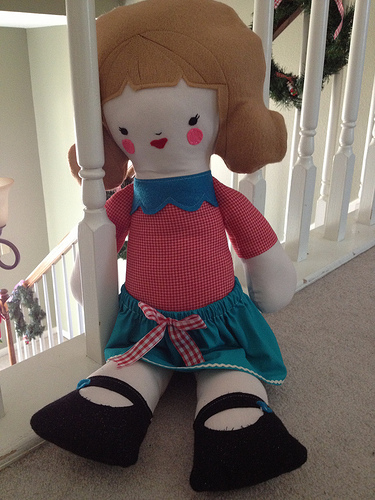
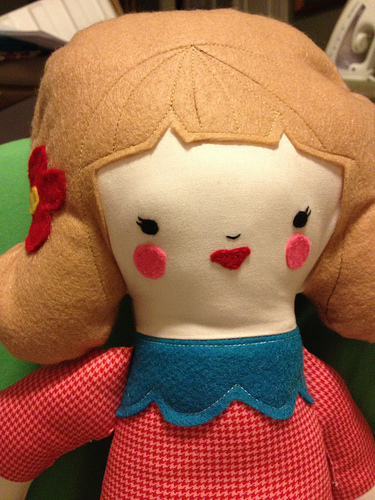
Then I bought a couple patterns from this super cute Etsy shop: http://www.etsy.com/shop/dollsanddaydreams
I finished the Big Doll in about 4 hours! Just in time to be a gift for my 1 yr old cousin :) Here’s Kinley’s big doll - I think she loved her.
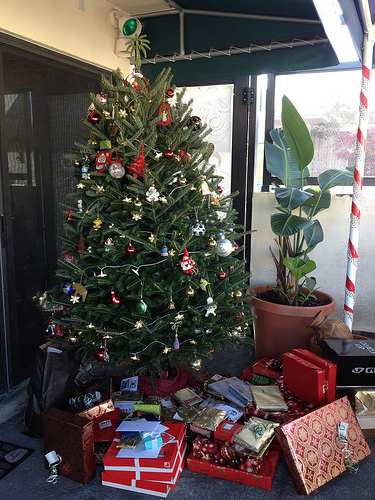
We had a beautiful Christmas in Miami with lots of family. I hope your holiday - whatever you celebrate - was also wonderful!
addictions blessings Crafts embroidery fabric flickr quilting sewing tutorials: 2012 christmas handmade holiday
by Blabby
leave a comment
Handmade Holidays underway
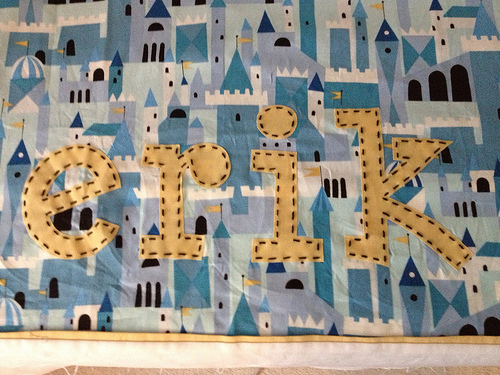
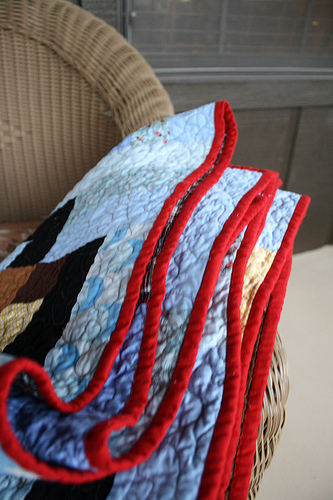
Got a little sewing done this weekend. I’m finishing up the binding on baby Erik’s (my gorgeous new nephew) quilt - finished pictures coming soon on that - but here’s a little preview.
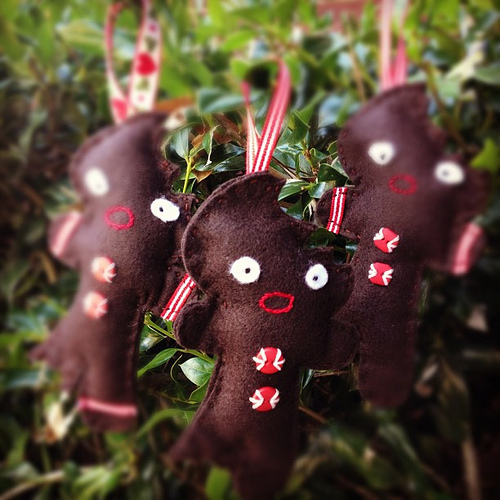
Also made some ornaments for family members. I used the awesome pattern and tutorial by Elsie Marley posted here. Super cute and simple. The best part about her pattern is that she sews the gingerbread man down to a felt rectangle and THEN cuts him out! So much easier that cutting two gingerbread men and sewing them together around the bite marks. Very smart!
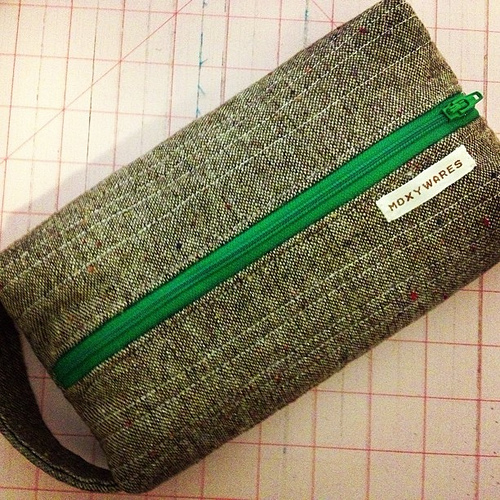
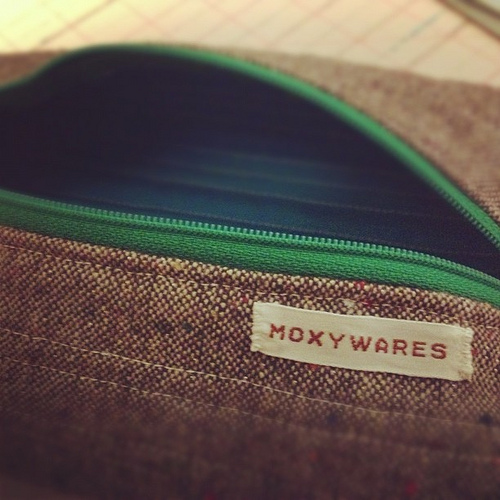
And finally, I got to work on a zipper pouch - I needed a gift for a man…hope it’s manly enough! I used this super simple tutorial by terrabytefarm.com posted here. I’ve made quite a few box pouches, and they were all kind of a pain. This tutorial was super easy. The key is that the inside is unfinished. But since I’m not crazy about all those little threads and stuff, I think next time, I’ll add a 1/2 inch to the length on one side when cutting the fabric and do french seams. I also added a handle by jamming a little rectangle of fabric into my corners before I squared them off. I’ll definitely use that tutorial again!
I also made these pillow cases a few weeks ago for some ugly leather pillows we have. It’s funny, now we use those pillows all the time - it seems like someone is always putting one behind their back. I swear no one ever used them before. So that makes me happy!

Surfer Dude Quilt
Katie over at Katie’s Corner made this super cool Super Hero Quilt. So I started making my plan based on her photo.
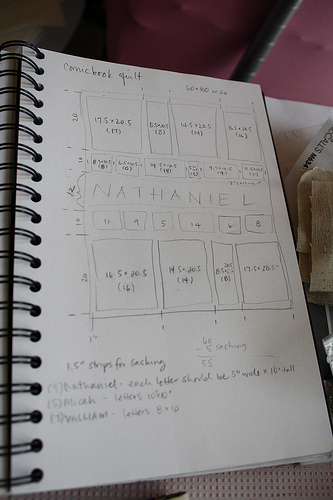
Here are my initial sketches and measurements. I decided that I wanted the quilt to be about 60″x80″, and worked in from there.
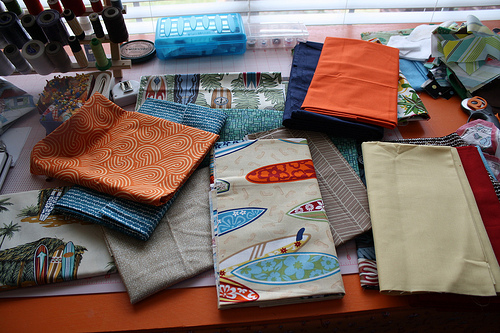
I knew I wanted to make one for each of my nephews with a surfer theme. Then, for the backs, I used their favorite team colors (FSU and UF). Here are the fabrics I picked out for the surfer side. I’ve been collecting surf-themed fabrics for a while, so I had everything I needed. I have some awesome hula girl fabric too, but I left that out because they’re still a little young.
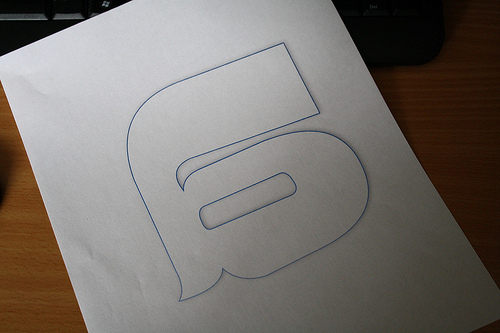
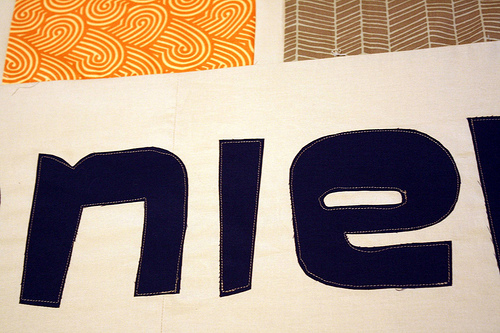
I pieced all the top and bottom strips, and next it was time to do the name applique. So I printed BIG letters in ‘mirror-image’ format on my printer.
Then I traced them onto the paper side of Heat-n-Bond Lite. Then I cut each letter out and ironed the glue side to the back of my fabric. Then I cut them out from the fabric and peeled the paper backs off and glued them down to my kona khaki piece that would go into the quilt. I just kind of eye-balled the spacing.
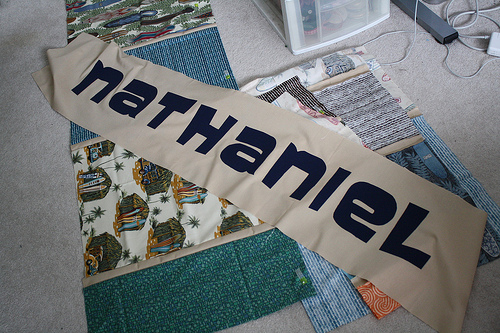
Then I just did a straight stitch around them about 1/4″ inside the edge. I tried a couple different stitches - zig zag, satin, but they didn’t look that great. The straight stitch looked great and was fast.
And here’s the completed top!
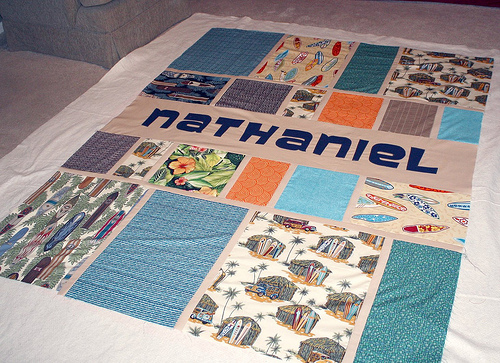
The backs are all done and Nathaniel’s is sandwiched. I’ll post some pics of the completed quilts soon. These were supposed to be Christmas gifts, but now they’re early January gifts :)
blabbery moxywares quilting quilting patterns sewing: boo davis dare to be square deer modern
by Blabby
leave a comment
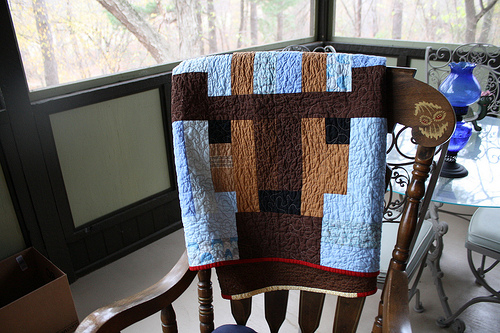
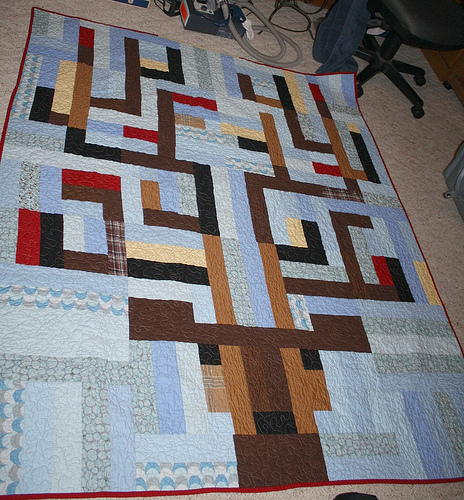
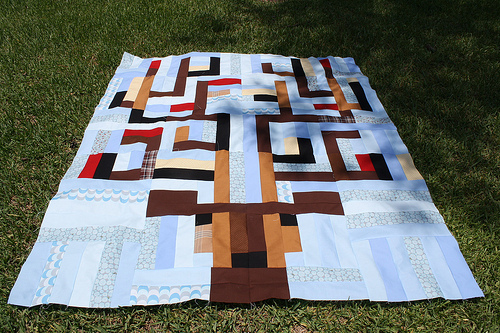
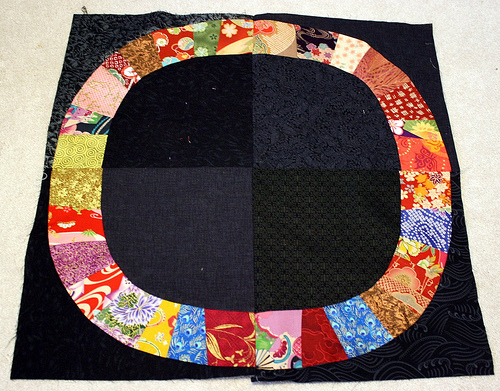
Deer Quilt Complete
This quilt was for my dad’s neighbor who helped build the screened-in porch. When I started it (about 5 months ago) I didn’t realize how Christmasy it was! Now I wish I had made the deer’s nose red. I hope he liked it!
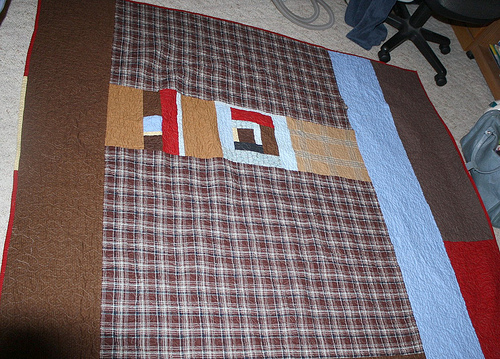
It’s made from a pattern in Dare to Be Square Quilting by Boo Davis. The fabrics are mostly Kona solids with some random blue prints (Lizzy House, Jay McCarrol) and some random plaids. I also got a yard of the brown plaid print for the back from Joanns.
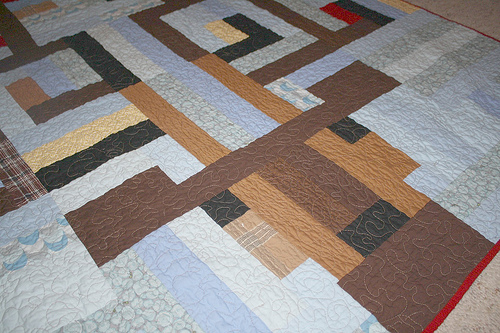
sew deer pt. 2
Well, I got this quilt all sandwiched and half quilted before I realized the bottom was bunching up. Such a bummer. That’s what I get for using discount basting spray that’s at least 2 years old. I spent two hours with a seam ripper removing half of the stippling I’ve done, and I just don’t feel like taking a picture of it. So instead, I’ll just share my finished quilt top before it was marred with a zillion needle holes.
I’d love to be doing more sewing. Let’s hope that now that school has started, there will be more time. Hope everyone had a great summer!
blabbery Crafts sewing tutorials: bendy straws costume dinosaur glider halloween handmade wing
by Blabby
1 comment
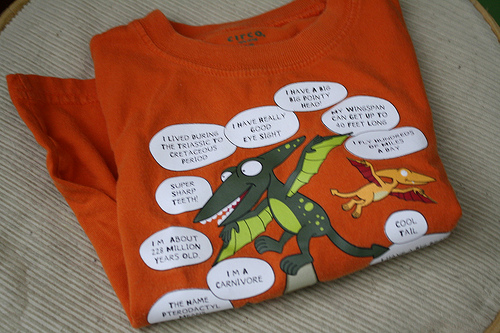
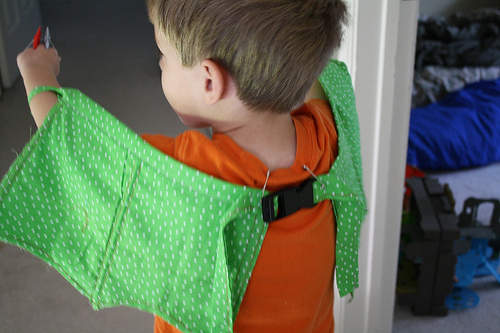
Let’s glide like pterosaurs!
My kid is dino crazy. They had a special Dinosaur Train deal at the Houston Zoo a few weeks back, and if you wore a costume, you got a prize. Well, we only have superhero costumes around here, so I whipped up some pterodactyl wings real quick.
For inspiration, we used this shirt…now a little too small, but it worked for one more day.
First I sketched out what I was aiming for - just the webbing that hangs down from their arms.
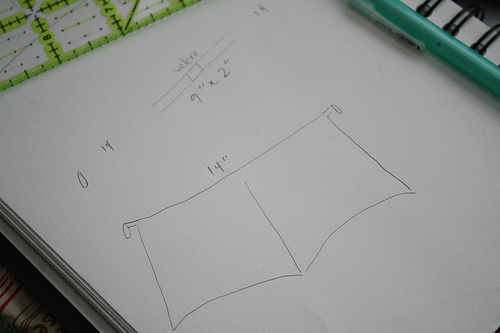
I started with a rectangle folded over to give me the double sided wing that I was aiming for:
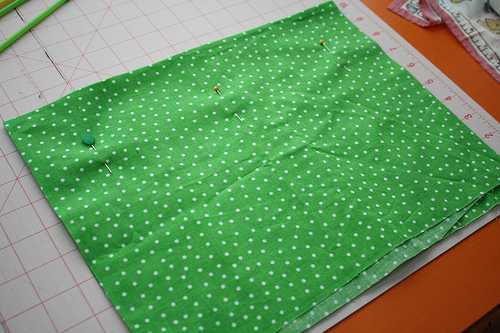
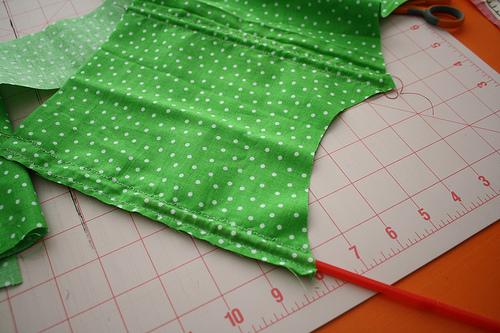
Then I used some fancy stitches that kind of look like fangs to make casings for my bendy straws - these are the ‘veins’ in the glider wing, so they hold their shape. After sliding the straws in, I cut away some arches in the bottom and then sewed the bottom closed with some top-stiching. I sewed right over the straws so they wouldn’t fall out.
After making two ‘wings’, I connected them with some binding with a backpack clip in the middle (because pterodactyls grow so quickly!). On each end of the binding, I sewed a smaller double fold bias strip with a little snap, so I could attach the wings to his wrists.

And to keep the glider up in the center of his shoulders, I just safety-pinned it to his shirt.
Ta Daaaa!
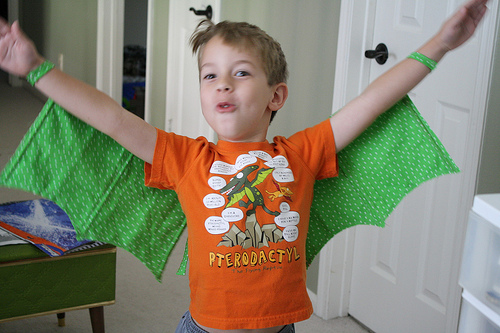
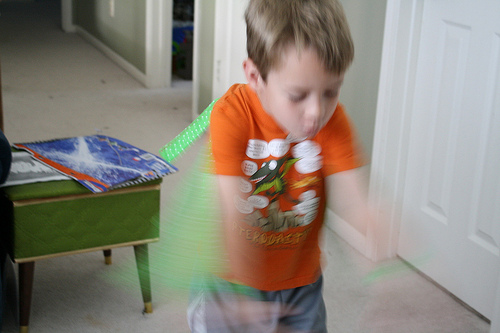
And some action shots:
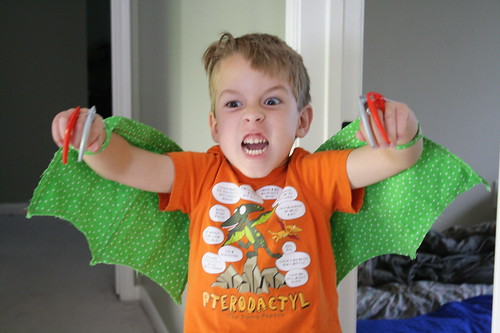
with claws:
Bee Happy blabbery Crafts denyse schmidt flickr sewing: anna maria horner diaper bag fabric handmade handmade beginnings here we go bag reverse applique sewing circles virtual bee
by Blabby
1 comment
Only 3 months to go!
Is it sad for me to celebrate the fact that I’m only 3 months behind on my virtual bee? I finished up two blocks this weekend, so now, I only have Jan, Feb and March to finish! Here are Oct and Nov’s blocks…those girls were so patient! (Thanks, Rosanna and Natalie!)
For Nov, Rosanna had us do a big Single Girl block. I’ve owned this pattern since Denyse published it, but as soon as I opened it up, I knew I would never make it. Denyse uses templates in a lot of her patterns where I don’t feel like templates are so necessary. Look at me - questioning the methods of Denyse Schmidt! But really, I love her quilts so much, I’m just too lazy to put the effort into them that the patterns call for. I guess that’s why they sell for so much money!
So anywhoo…Rosanna cut ALL THE PIECES! She sent us these nice little packages of all the little shapes that make one ring. I can’t imagine the time she spent preparing those packages. All I know is that I got to do the fairly simple sewing on this awesome block without doing any of the mundane or tedious pattern tracing and cutting. So thanks, Rosanna! Taking this pattern out for a spin showed me that it’s not the big, awful pain I thought it would be. And if I cut multiple pieces (stacked fabric, cut four or five at a time), I could almost see making a quilt with it. The finished block was huge, so six would make a great baby quilt.
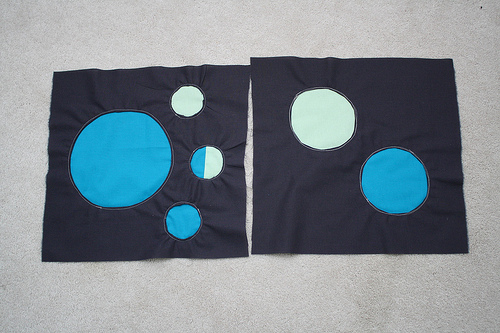
And then for Nov., Natalie wanted porthole blocks. This was a fun new technique for me. Although, I never could get my seams as smooth as I wanted. We used Ric Rac’s tutorial - which is super easy. I’m sure I’ll use this technique again - and really, you could do any shape.
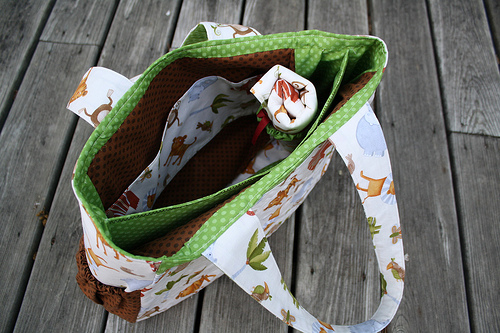
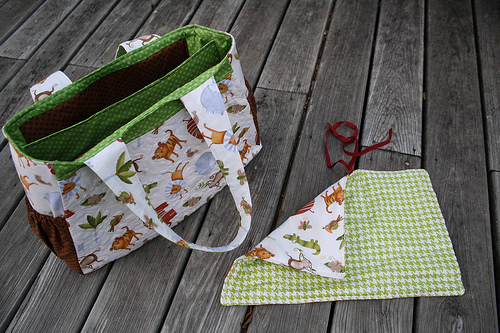
In other sewing news, I finished up the Here We Go bag for my aunt Jamie. Using the pattern in Anna Maria Horner’s book Handmade Beginnings - Jamie picked her own fabrics, and I put together this GIANT diaper bag. Pretty easy pattern, and the technique used for closing up the top and sewing the inside and outside together was suprisingly easy. I normally make bags using the ‘birthing’ method - where you flip the whole bag right-side-out through a small hole in the bottom. This bag uses a bias strip sewn around the whole top like quilt binding. I ended up hand-stitching it down, just like I would do a quilt. Not bad at all.
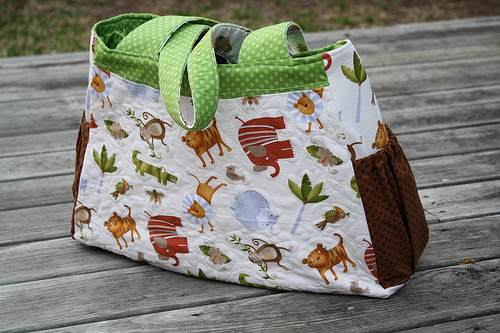
The bag has a center divider with pockets on both sides and pockets around the inside lining. There’s also a little elastic loop that holds the changing pad.
And I found a great laminated herringbone fabric on fabric.com - perfect for the changing pad. Although, I really need to get one of those slippery feet for sewing on vinyl and stuff…what a pain in the neck!
blabbery books Crafts: boo davis elizabeth hartman hulu karen marie moning nook quilts sewing
by Blabby
5 comments
999 Comments!
How cool is that…I’m one comment away from 1000 comments! Awesome. During my brief blogging haitus due to moving from CA to TX, lots of people have been finding my free hex templates and my hand sewn hex tutorial. I love link backs (hint hint) - seeing new hex projects is super fun.
Look at this little bit of awesomeness - if Betty Draper Francis could sew, she’d be a member: http://midmodbee.blogspot.com/
My sewing machine, tv and tivo are all in storage. Sad, sad, sad. The upside to our extended wait for our house is that I haven’t bought any new fabric or craft books for almost 3 months! Personal record, my friends. I’m still watching a considerable amount of tv online - thank goodness for hulu.
I do have my eye on a few new books though - namely The Practical Guide to Patchwork by Elizabeth Hartman (a.k.a. Oh Fransson!) and Dare to be Square Quilting by Boo Davis. Super original designs. Very, very cool.
Also, my new addiction is my nook. I’ve been blowing through all of Karen Marie Moning’s books - both the Fae and Highlander series are muy excellente!
Teacher Gifts
teacher gifts-1, originally uploaded by Beaty Family Fun.
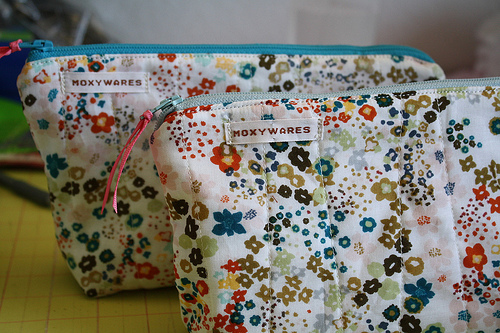
I made these little zipper pouches for my son’s preschool teachers. Tucked inside each one was a matching coffee quilty, a key fob with a charged up Starbucks card on it, and a card. I think these little gifts were a hit!
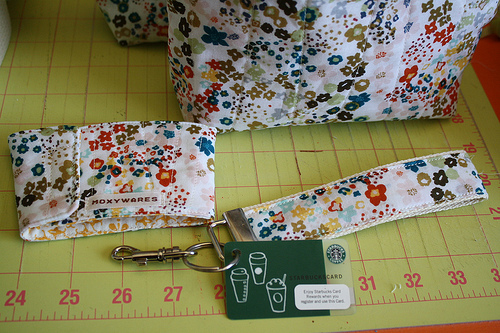
The floral fabric was a find at Joanns. I found three precut fat quarters and THAT’S IT! I’d love to find more. It’s got all my favorite colors in it.