blessings Crafts flickr quilting sewing: craft room diy houndstooth ironing board
by Blabby
2 comments
Craft Room: New storage!
There’s a corner of my office/sewing room that is getting a little Hoarder-y. I’ve finished a couple quilts lately and kind of thrown all the cut away batting/scraps on top of this bin. And then I bought some fleece and felt for doll construction and some wovens for scarves and some vintage table cloths and I think you’re getting the picture. That pile is getting CRAZY.
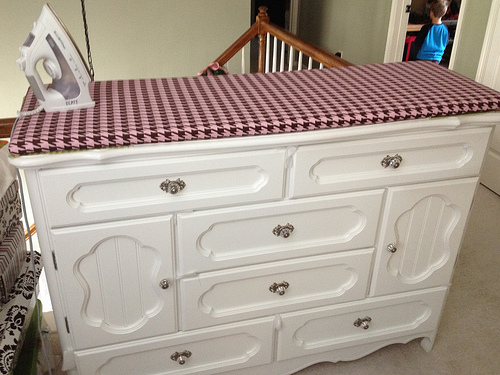
So we got this pretty dresser this weekend. It was brand new - possibly the 2nd brand new dresser I’ve ever bought in my life. I don’t know what came over me! But there we were, in the pretty princess little girls section of Rooms To Go, and the sparkly knobs were just calling my name.
It was right next to the Cinderella carriage bed with the sparkly netting. Do you know what I’m talking about?
So here it is (imagine angels singing):

When I started the dresser search, I went to Goodwill first. They pretty much never have any good furniture at our Goodwill, but I wanted to try. So of course, they didn’t have any good furniture, but they did have a roll of home dec-weight pink and brown houndstooth fabric for $10! I can see the original Hancock’s tag inside that says it was originally $17+ a yard. There are at least 5 or 6 yards on this roll!!! SCORE! Who knows what I’ll use it for - at this price, I might use some of it as stabilizer! Who cares?!
So with my new houndstooth, I have the perfect canvas to make my own ironing board to top whatever dresser I find.
So we got the dreamy dresser, and I got some 3/4″ plywood at Home Depot cut to the right size and my handy staple gun out…
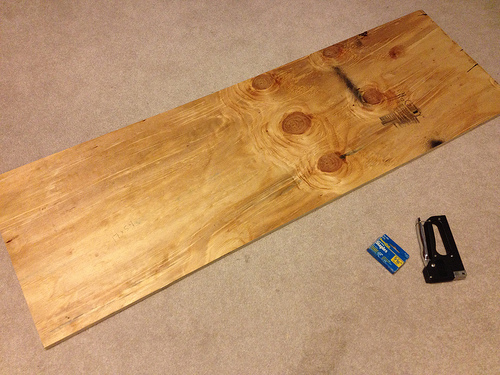
And 4 layers of cotton batting and one layer of insul-bright and one layer of bargain basement houndstooth later, and I have an AMAZE-BALLS new storage dresser and ironing board!
Can you tell I’m excited?
addictions blessings Crafts embroidery fabric flickr quilting sewing tutorials: 2012 christmas handmade holiday
by Blabby
leave a comment
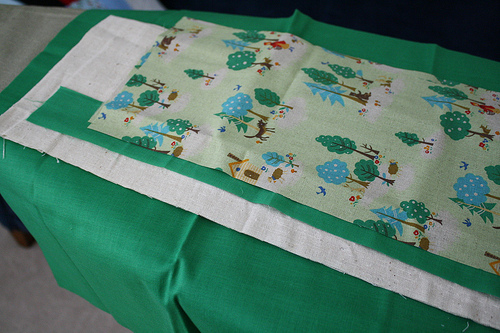
Handmade Holidays underway
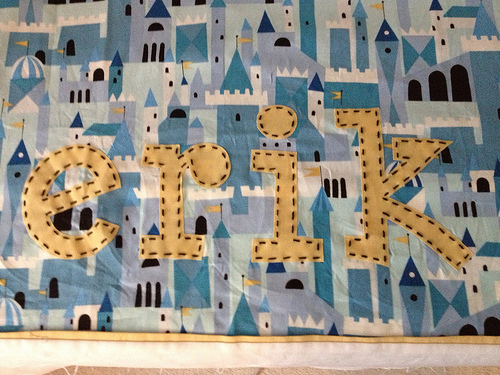
Got a little sewing done this weekend. I’m finishing up the binding on baby Erik’s (my gorgeous new nephew) quilt - finished pictures coming soon on that - but here’s a little preview.
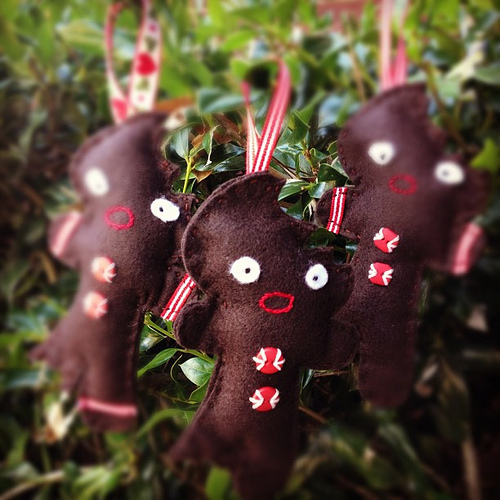
Also made some ornaments for family members. I used the awesome pattern and tutorial by Elsie Marley posted here. Super cute and simple. The best part about her pattern is that she sews the gingerbread man down to a felt rectangle and THEN cuts him out! So much easier that cutting two gingerbread men and sewing them together around the bite marks. Very smart!
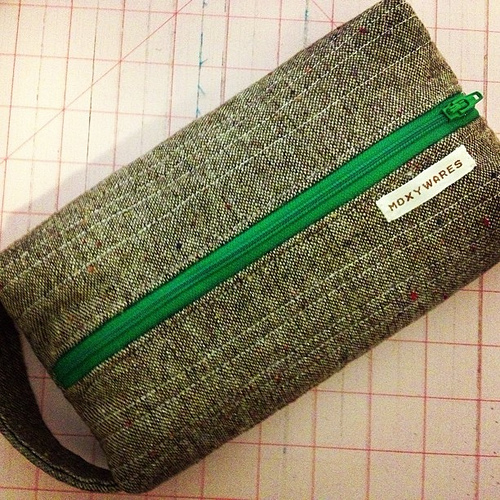
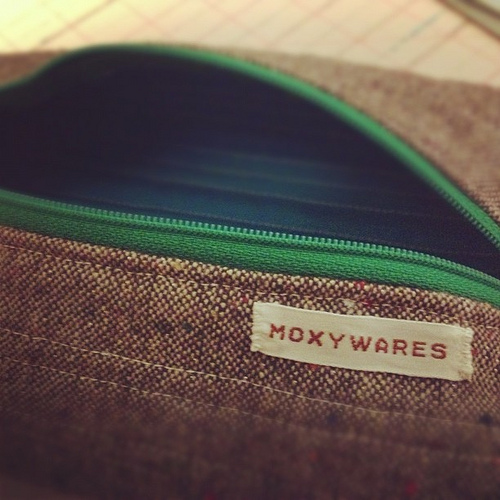
And finally, I got to work on a zipper pouch - I needed a gift for a man…hope it’s manly enough! I used this super simple tutorial by terrabytefarm.com posted here. I’ve made quite a few box pouches, and they were all kind of a pain. This tutorial was super easy. The key is that the inside is unfinished. But since I’m not crazy about all those little threads and stuff, I think next time, I’ll add a 1/2 inch to the length on one side when cutting the fabric and do french seams. I also added a handle by jamming a little rectangle of fabric into my corners before I squared them off. I’ll definitely use that tutorial again!
I also made these pillow cases a few weeks ago for some ugly leather pillows we have. It’s funny, now we use those pillows all the time - it seems like someone is always putting one behind their back. I swear no one ever used them before. So that makes me happy!

blabbery fabric flickr sewing: pillow case dress sewing for kids
by Blabby
3 comments
pillow case dresses and matching t’s
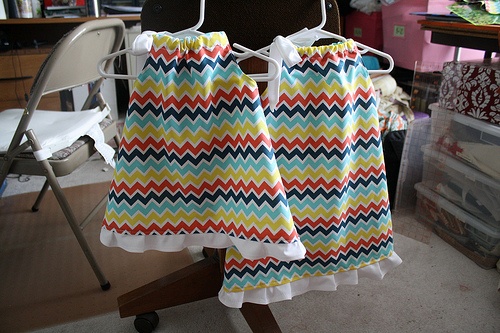
I got to do some sewing this weekend (thanks, honey!). My neighbor has four of the cutest kids you’ve ever seen - two boys, two girls. She asked me if I could make them some coordinating outfits for a picture, and mentioned pillow case dresses she’s seen all over the interwebs.
I looked all around at the MANY pillow case dress tutorials (what did we ever do before the internet?) and found two that I kind of squashed together. For the basic shape/pattern size, I used this one from prudentbaby.com. For the arm holes and the ruffle, I used this one from CraftSnob.com.
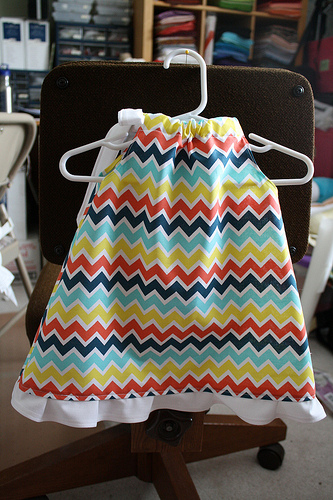
I actually ended up not doing the ruffle using her gathering technique, because I pulled too hard and snapped my thread mid-gather. So I ended up folding a quarter inch on my ruffle strip every two inches and pinning a lot.
I also went ahead and made my own tie string/double binding strip for all the dresses using 3″ by length-of-fabric (selvedge to selvedge) folding each long edge in, and folding the whole thing in half. This way, I could match my ruffle and tie strap without going to the fabric store. Not that that would be a hardship.
I have seen another gathering technique where you lay a piece of thread down on the length of whatever you’re sewing, and then sew a zig zag over it, creating a kind of casing for your gathering thread - that’s worked better for me personally in the past. Also, I’ve seen sewing machines that come with a gathering foot! That would be awesome.
Anyway, for the two sweet boys, I made t-shirts with tie appliques in the matching chevron fabrom. I got the template fro the ties from here at CrapIveMade.com.
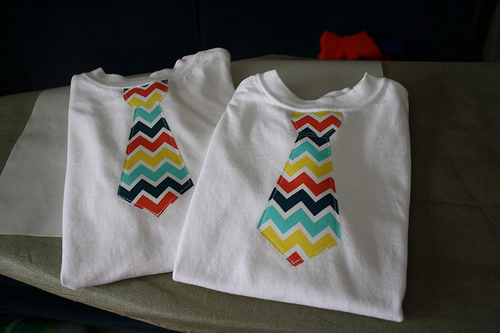
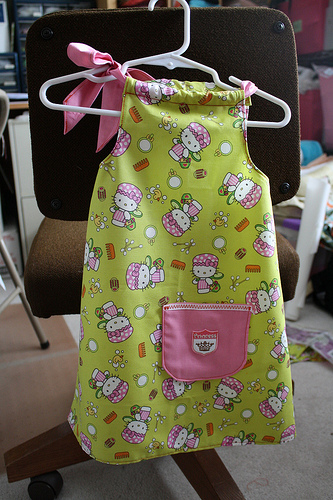
The whole deal, including my rough draft Hello Kitty dress (below), took about 5 hours - most of which was ironing and stiching seams (arm holes, dress bottoms, ruffle strips, binding piece for bows.) The t-shirts took about 15 minutes total.
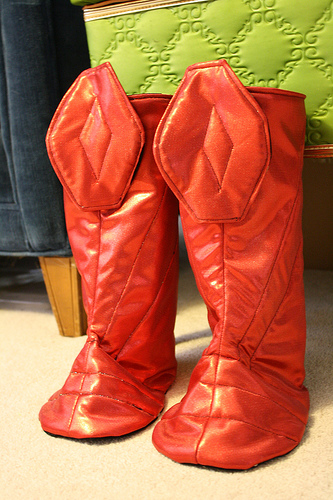
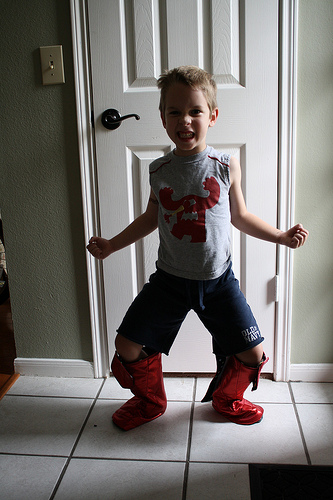
Super Boots!
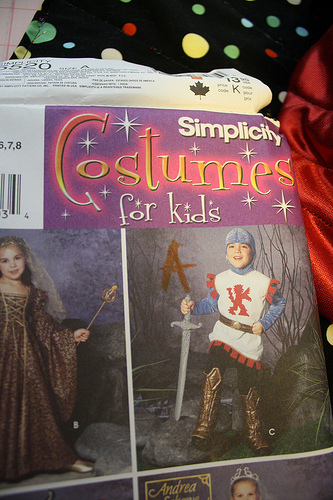
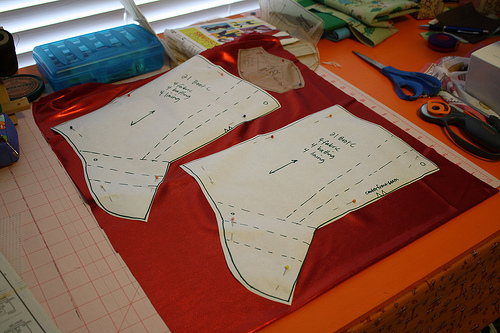
We’re gearing up for Halloween around here. Instead of sewing a big costume this year, I decided to make a bunch of pieces. My kid loves costumes every day of the year, so better to have a little mix and match. Up first is super boots! They’re a little big, but I figure over pants and shoes, they’ll be fine. The Simplicity 5520 pattern was super easy to follow - we’re making the helmet and armor next. The shiny red fabric is something from the halloween shelf at Joann’s. It’s super silky and shiny. We got a bunch of colors (red, black, silver, gold) for the costume parts.

addictions fabric flickr heather bailey recycle sewing: alicia paulson jane market bag linen pattern tote
by Blabby
leave a comment
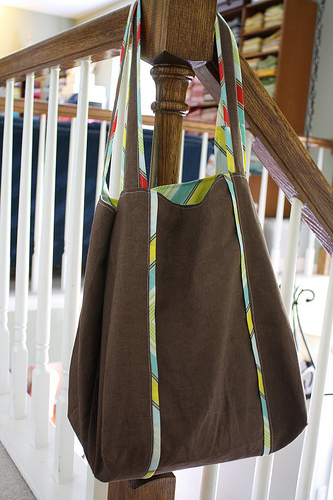
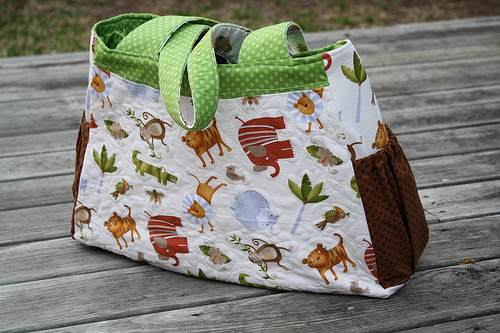
Jane Market Bag
I got to do a little sewing recently. I’ve been dragging around my Purl Soho tote bag for months and months and it is sorely in need of a wash, but I hate all my other bags. So I thought I’d make something similar, but less NPR-free-tote. (Not that I don’t totally love a free tote).
So, anywho, I started checking around the interwebs for some inspiration and found about a zillion people had made this lovley Jane Market Bag. As evidenced by the very numerous search results on flickr here and the fact that it has it’s own group here. I should note that this pattern is actually supposed to be used as a fun grocery bag. Most of the changes I made (that I’m about to talk about) came about because I wanted to turn it into more of a big catch-all purse.
I bought the pattern for the bargain price of $6. It took me longer to pick out some fabrics than to do the cutting for this VERY easy and user friendly pattern. (Kudos to Alicia at rosylittlethings.com for such an easy to use pattern.) Recommended for beginning sewists. (sewers? I always think that reads like sewers where rats live…not sowers.)
So first - here was my initial fabric selection:
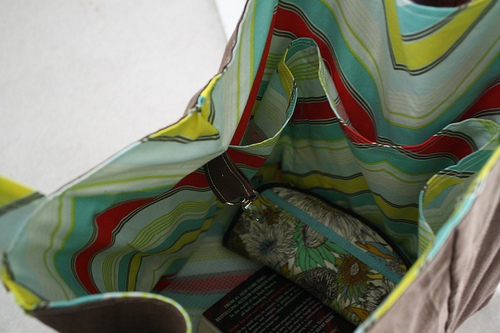
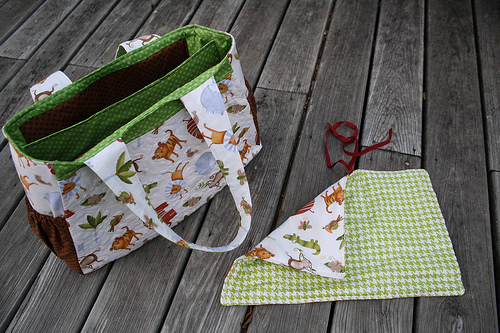
I really needed a neutral bag that I could carry anytime. So that eliminated most of my prints for the outside. I love linen, and although I’m not sure it’s really sturdy enough for a bag, I went with it. Sadly, I didn’t have enough of this brown linen to do a front and back pocket, so I just did a front pocket.
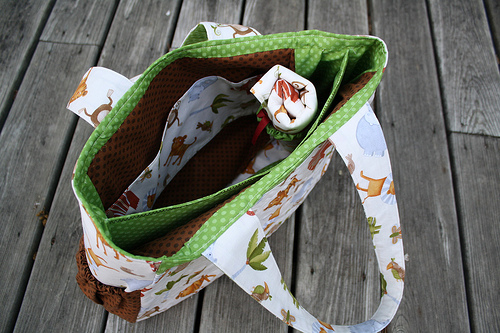
I deviated from the pattern a little by adding some piping strips to the front, back and handles. I also added pockets inside and a little key hook inside so I wouldn’t have to dig around for my forever-missing keys.
Front:
Inside:
Back:
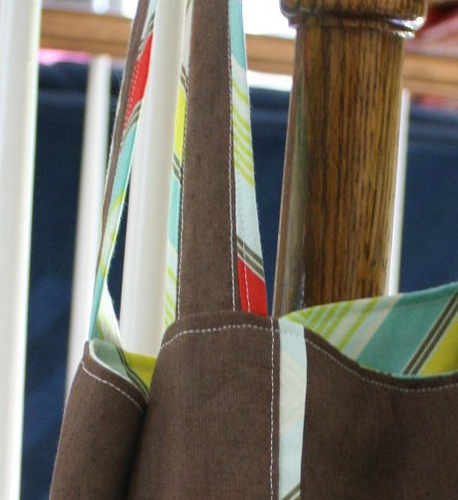
I really liked the piping, but it was a little too fat. I used a one inch strip, folded in half and sewn into the seams between the panels on the front and back. I should have just done a half inch. So it looked more like this piping (the super skinning piping on the left and right of the pocket):
For the straps, the pattern calls for 4″ x something (21″ I think?) strips. But that seemed like it would be too short for me (I measured my Kroger .99 cent grocery bags as a baseline because they never fall off my shoulder), so I went with 4″x 26.5″. But to get the print on the edges that I wanted, I did 1″ of brown and 3″ of pop garden - sewed them together along the long edge, and then closed the loop by sewing the other long edge of brown to the long edge of pop garden. Make sense? It gave me a tube - inside out. I used my crochet hook to flip it right side out, and pressed it centering the brown linen. Then I top stitched it inside and outside the brown.
Finally, instead of sewing the straps to the outside of the bag like in the pattern, I sewed them in at the same time that I sewed the lining to the outside of the bag. I’m not spatially smart enough to explain how this works, but you sew them in before you pull everything out through the bottom hole. You can see a great video of this ‘birthing’ method here: birth of a bag video by sugar sugar bags. She’s got the straps sewn inside also.
I’ve been carrying my new bag around for a few days now, and overall, I like it a lot. I’m planning a 2nd one, and next time, I’ll sew a bottom seam at the bottom of all pockets so my cell phone doesn’t slide down UNDERNEATH the bag. I just hate that. Also, I may consider interfacing. I was too lazy to put it in this time, and the pattern certainly doesn’t call for it. But even cotton batting would make this bag a lot more stable.
Here’s the fabric selection for the 2nd one - natural linen body, green red riding hood fabric for the pockets, green solid for the inside and piping. Should be cute!
Bee Happy blabbery Crafts denyse schmidt flickr sewing: anna maria horner diaper bag fabric handmade handmade beginnings here we go bag reverse applique sewing circles virtual bee
by Blabby
1 comment
Only 3 months to go!
Is it sad for me to celebrate the fact that I’m only 3 months behind on my virtual bee? I finished up two blocks this weekend, so now, I only have Jan, Feb and March to finish! Here are Oct and Nov’s blocks…those girls were so patient! (Thanks, Rosanna and Natalie!)
For Nov, Rosanna had us do a big Single Girl block. I’ve owned this pattern since Denyse published it, but as soon as I opened it up, I knew I would never make it. Denyse uses templates in a lot of her patterns where I don’t feel like templates are so necessary. Look at me - questioning the methods of Denyse Schmidt! But really, I love her quilts so much, I’m just too lazy to put the effort into them that the patterns call for. I guess that’s why they sell for so much money!
So anywhoo…Rosanna cut ALL THE PIECES! She sent us these nice little packages of all the little shapes that make one ring. I can’t imagine the time she spent preparing those packages. All I know is that I got to do the fairly simple sewing on this awesome block without doing any of the mundane or tedious pattern tracing and cutting. So thanks, Rosanna! Taking this pattern out for a spin showed me that it’s not the big, awful pain I thought it would be. And if I cut multiple pieces (stacked fabric, cut four or five at a time), I could almost see making a quilt with it. The finished block was huge, so six would make a great baby quilt.
And then for Nov., Natalie wanted porthole blocks. This was a fun new technique for me. Although, I never could get my seams as smooth as I wanted. We used Ric Rac’s tutorial - which is super easy. I’m sure I’ll use this technique again - and really, you could do any shape.
In other sewing news, I finished up the Here We Go bag for my aunt Jamie. Using the pattern in Anna Maria Horner’s book Handmade Beginnings - Jamie picked her own fabrics, and I put together this GIANT diaper bag. Pretty easy pattern, and the technique used for closing up the top and sewing the inside and outside together was suprisingly easy. I normally make bags using the ‘birthing’ method - where you flip the whole bag right-side-out through a small hole in the bottom. This bag uses a bias strip sewn around the whole top like quilt binding. I ended up hand-stitching it down, just like I would do a quilt. Not bad at all.
The bag has a center divider with pockets on both sides and pockets around the inside lining. There’s also a little elastic loop that holds the changing pad.
And I found a great laminated herringbone fabric on fabric.com - perfect for the changing pad. Although, I really need to get one of those slippery feet for sewing on vinyl and stuff…what a pain in the neck!
Bee Happy blabbery books flickr quilting patterns sewing: boo davis elizabeth hartman january modern quilt guild national blood donor month oh fransson project modern
by Blabby
leave a comment
TGIF!
I think Friday is my favorite day of the week. The feeling of joy I get at about 6 pm on a Friday is unmatched by anything else these days.
That was a little bleak.
So anyway, it’s blood donor month. Did you know that? One donation can help up to 3 people! I’ve got my appointment tomorrow morning at 9:45 am. I love having a donor center right around the corner!
 I got two new sewing books burning a hole in my metaphorical sewing pocket. Did I blog about these already? My blogging has been so intermittent…anyway, I’m super excited about them. First off is Elizabeth Hartman’s Practical Guild to Patchwork. Of course, there’s already a big Oh

Fransson group on Flickr - check out some of the projects! Besides the great quilts in her book, I also want to give mod mosaic a try. How cute is that? And everyone posting their pictures say it’s really easy.
My other new book is Dare to Be Square by Boo Davis. Super cute projects - especially the robot. And the weiner dog. Her patterns are totally unique. I love straight lines - she’s got such a fun mix of quilts in this book. AND, she’s a totally awesome illustrator. Check it.
So that’s what I’ll be working on in the near future. That and my outstanding bee blocks and some sweet baby gifts for my new cousin Jackson due in Feb.
Oh! And I almost forgot! I’m going to do Project Modern Challenge #2. I’ve been doing some sketches, but I’m not quite to the sharing stage. Thanks to the awesome Modern Quilt Guild for setting it up! Look at all the super awesome entries from Project Modern: Challenge #1!
Have a great weekend!
blabbery Crafts fabric flickr gems on the web quilting sewing: ikea sew mama sew
by Blabby
3 comments
Gems on the Web
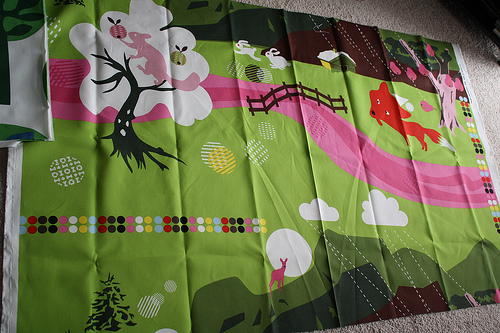
How awesome is this fabric? It’s home dec weight canvas from Ikea. This is a one yard cut - the fox is huge! And so perfect :)
New to quilting? Check out this fun little pdf download over at Sew,Mama,Sew! It’s a Quiltalogue, a printable mini-book of quilting terms. How handy!
Need some more inspiration to get sewing? If you didn’t get your fill browsing the Quilts of the Day on Sew, Mama, Sew!, check out my new favorite group on Flickr: { Handsome } Hexies.
Or how about Elizabeth’s new potholders?
Seriously. So much inspiration everywhere!
blabbery flickr quilting patterns sewing tutorials: hexagons
by Blabby
45 comments
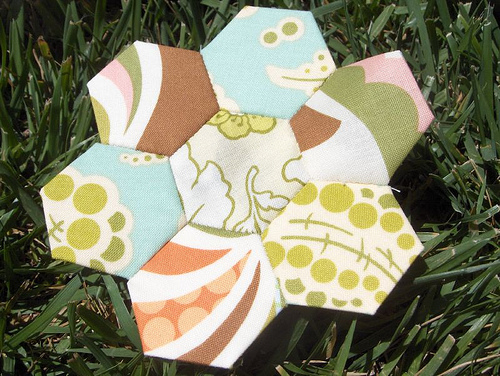
Hand-Sewn Hexagon Tutorial
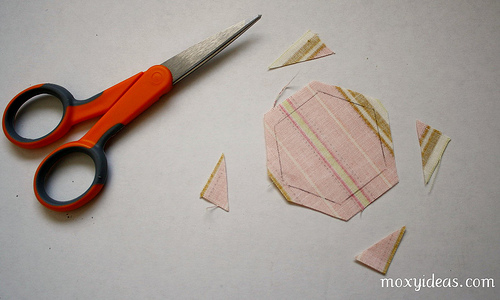
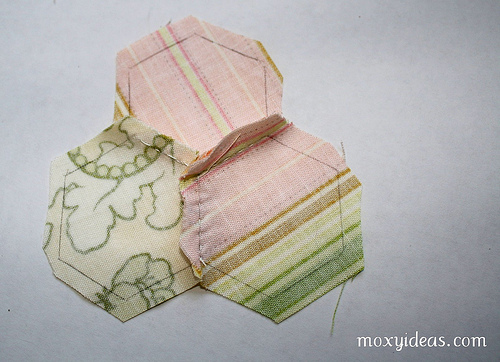
Here’s my little tutorial for hand-sewing hexagons together without using paper templates inside the hexagon.
First, download the hexagon template you want to use. Cut out your shape - you really only need one or two. (I made the template sheets for people who need lots for English paper-piecing). You can pre-cut your fabric into squares a little larger than your template (at least a 1/2″ on all sides), or just keep your fabric whole. Trace your shape. A lot!
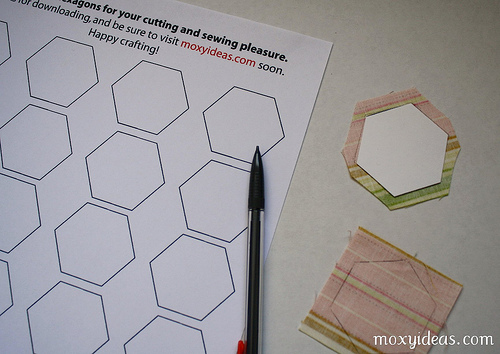
Cut out your hexagons, leaving a good 1/4″ seam allowance all the way around.
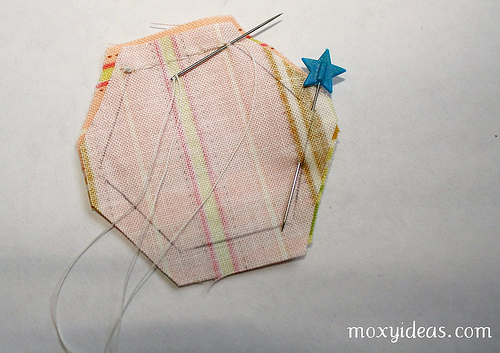
Place two trimmed hexagons right sides together and stick pins through two corners. Don’t worry about your outer edges lining up, just get your pencil lines to match. Two pins - one at each end of one side of the hexes - is the easiest way to get a good match.
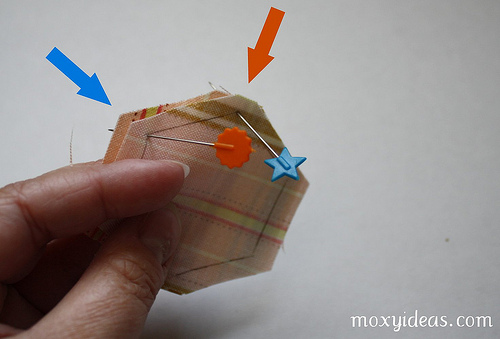
Stick your pins in along the lines away from where you’re going to sew so they’re out of your way. Thread your needle, and put a knot in one end. Use the knot to anchor one more corner together - this will be your starting point. I like to start and stop with a tiny back stitch at each corner when sewing these hexes together, just to make the intersections stronger.
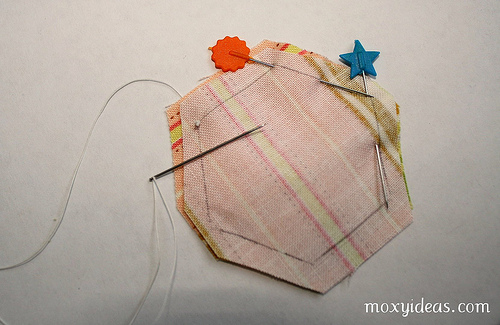
Pushing your needle up and down in a running stitch, sew right along your pencil lines.
As you get to the end of your side, remove the pin to get it out of your way. Sew your running stitch all the way to the next corner. Once there, sew a small back stitch to secure the corner. Be careful not to pull your thread tight - it will gather your hexes. You’ll have to continually loosen the fabric back to a nice flat seam.
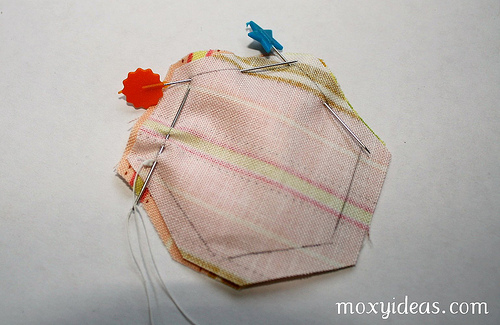
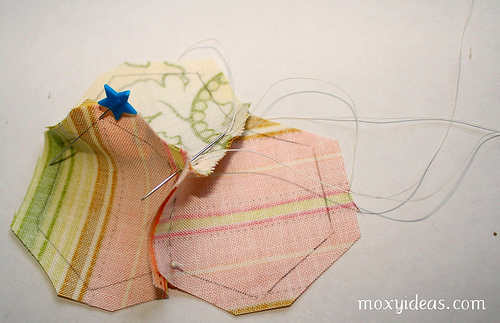
Now you’re ready for a third hexagon. You can add it anywhere, but for this tutorial, I just kept moving to the right. Open your first two hexes and line your third hex up right sides together with your second hex. Use a pin in the corner to keep them lined up.
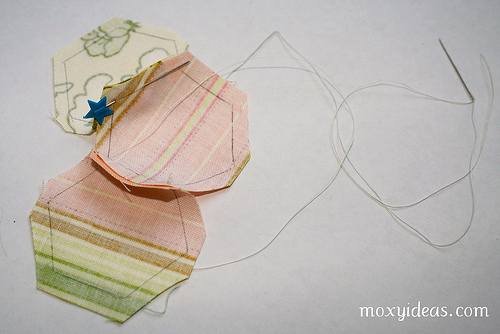
After a quick back stitch through the second and third hex, to both join them and secure the intersection, continue your running stitch to the next corner.

Now you’re at the far right side, and you need to get back to sew hexes one and three together. You can do a back stitch and tie a small knot and cut your thread, or you can do a back stitch and sew a few stitches to run the thread back to the center. I do the latter…it may be laziness, but I try to see how far I can get without ever cutting the thread.
Use the same method of lining up hex one and three, right sides together, and securing the outside corners with a pin. Sew with a running stitch toward your pin.
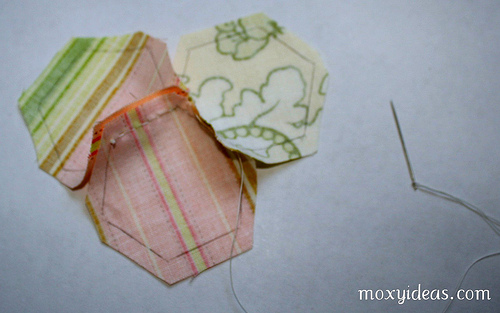
I’ve stopped at three here, but you can just keep adding more and more around, choosing where to place the next one based on where your thread left off. Here’s the back - I’ve finger pressed the seams.
Here’s the front. Once I’ve got all the hexagons I want, I use spray starch to flatten out the seams. Eventually, I’ll also use spray starch to turn the outside edges under, and I applique my hexes down to a foundation. I guess you could just keep going and going until you make a whole quilt, but that is a little ambitious for me.
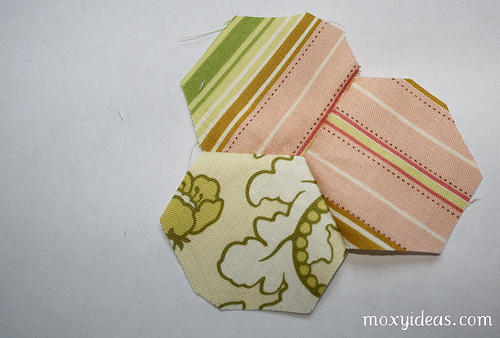
So that’s it! I hope it helps someone. Sewing these goes super fast - it took ten times as long to write this tutorial as it did to sew those hexes together. I hope you’ll link back to me with pictures of your completed projects!
blabbery flickr quilting sewing: english paper piecing hexagons templates
by Blabby
2 comments
revisiting hexagons
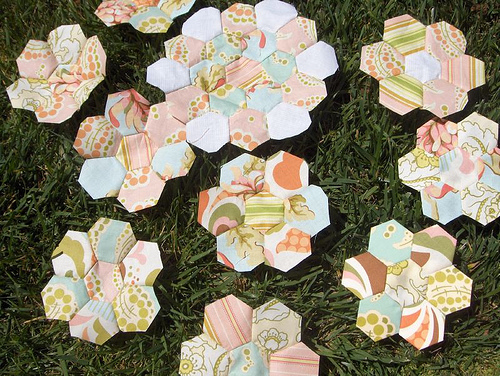
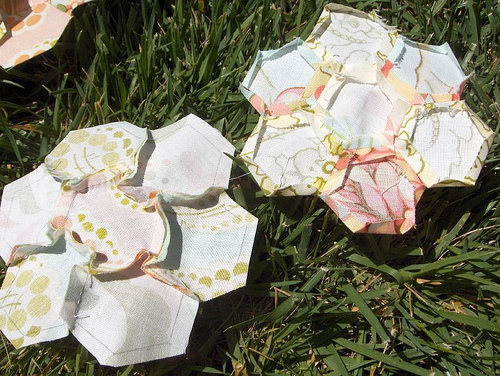
After seeing this super cute picture on flickr and reading her comment about her whip stitches showing, it reminded me that I wanted to revisit the topic of english paper piecing verses simply sewing your hexagons together.
I’ve had hexagon templates available for download on here for a while now. I recently added a couple more sizes. I also added some triangles, but then realized that someone had requested diamonds, not triangles, so I’ll be redoing those :) But the triangles might be fun too - who knows?
ANYWHOO…here’s what I wanted to talk about. After I went through all the trouble (actually, not much trouble at all) of making those templates, printing them, cutting them all out, sewing a bunch into fabric squares using Sunshine Creation’s awesome tutorial, I found that although it was very neat (as in precise, not neat-o), it was too double-the-work for my taste. And when I went to sew together my perfectly neat little hexes with their papers inside, I could not hide the joining stitches, no matter how small my stitch, no matter what thread.
Finally, I ended up just tracing the hexes onto the wrong side of my fabric. I pin them together and and sew along my pencil lines using a running stitch. Super fast and easy. I think I’ll do a tutorial of my own. Maybe tomorrow…with pictures!
The back is a lot messier, but if you use a little Best Press or something, they’ll press right down.
Hexagons are so fun and come out so cute, but the papers inside is so much EXTRA work (to me.) Once it’s all said and done, I don’t think you can tell the difference. The picture at the top has one english paper-pieced flower - you can tell because it’s edges are turned under (bottom right corner). Here it is below and I think you can really see the stitches, which is annoying. The last picture shows the differences in the backs before pressing. But again, I used a little Best Press, and had no trouble getting those seams to lay flat.