blabbery flickr quilting patterns sewing tutorials: hexagons
by Blabby
39 comments
Hand-Sewn Hexagon Tutorial
Here’s my little tutorial for hand-sewing hexagons together without using paper templates inside the hexagon.
First, download the hexagon template you want to use. Cut out your shape - you really only need one or two. (I made the template sheets for people who need lots for English paper-piecing). You can pre-cut your fabric into squares a little larger than your template (at least a 1/2″ on all sides), or just keep your fabric whole. Trace your shape. A lot!
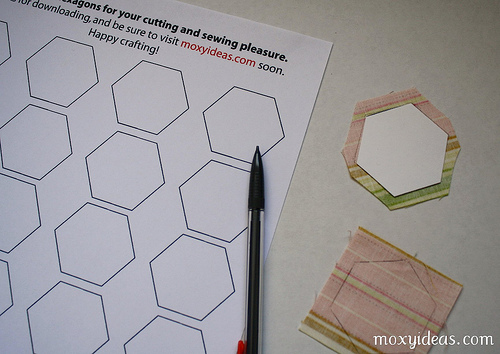
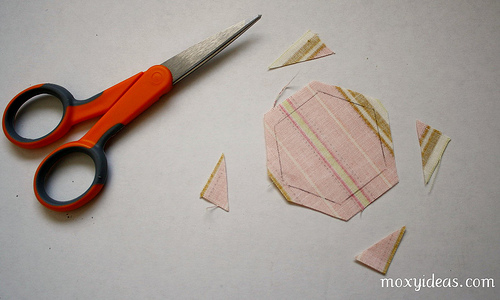
Cut out your hexagons, leaving a good 1/4″ seam allowance all the way around.
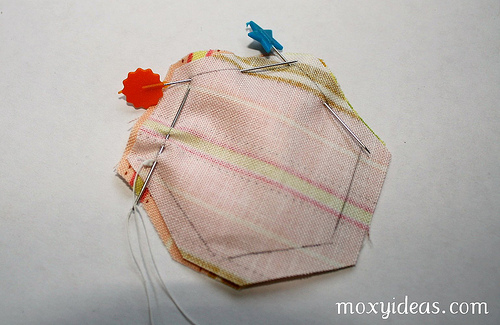
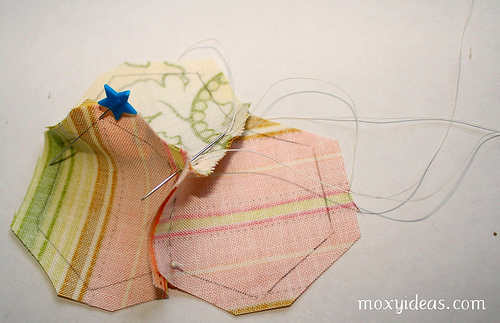
Place two trimmed hexagons right sides together and stick pins through two corners. Don’t worry about your outer edges lining up, just get your pencil lines to match. Two pins - one at each end of one side of the hexes - is the easiest way to get a good match.
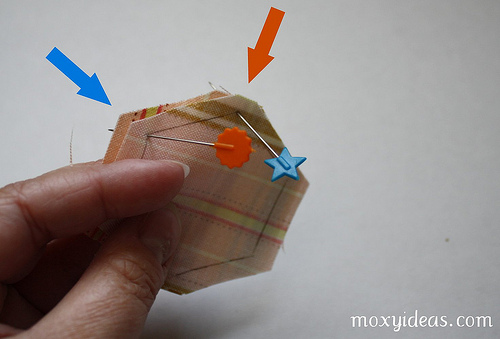
Stick your pins in along the lines away from where you’re going to sew so they’re out of your way. Thread your needle, and put a knot in one end. Use the knot to anchor one more corner together - this will be your starting point. I like to start and stop with a tiny back stitch at each corner when sewing these hexes together, just to make the intersections stronger.
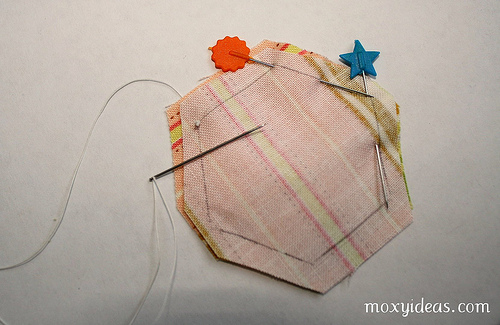
Pushing your needle up and down in a running stitch, sew right along your pencil lines.
As you get to the end of your side, remove the pin to get it out of your way. Sew your running stitch all the way to the next corner. Once there, sew a small back stitch to secure the corner. Be careful not to pull your thread tight - it will gather your hexes. You’ll have to continually loosen the fabric back to a nice flat seam.
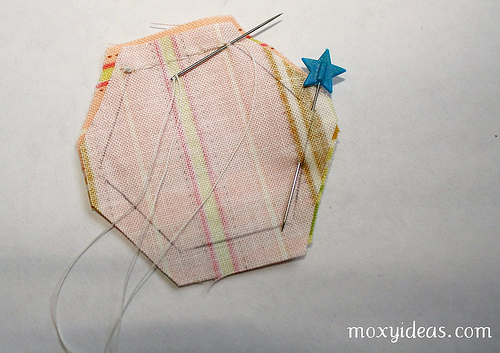
Now you’re ready for a third hexagon. You can add it anywhere, but for this tutorial, I just kept moving to the right. Open your first two hexes and line your third hex up right sides together with your second hex. Use a pin in the corner to keep them lined up.
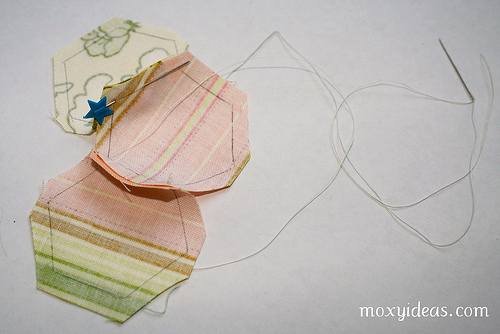
After a quick back stitch through the second and third hex, to both join them and secure the intersection, continue your running stitch to the next corner.

Now you’re at the far right side, and you need to get back to sew hexes one and three together. You can do a back stitch and tie a small knot and cut your thread, or you can do a back stitch and sew a few stitches to run the thread back to the center. I do the latter…it may be laziness, but I try to see how far I can get without ever cutting the thread.
Use the same method of lining up hex one and three, right sides together, and securing the outside corners with a pin. Sew with a running stitch toward your pin.
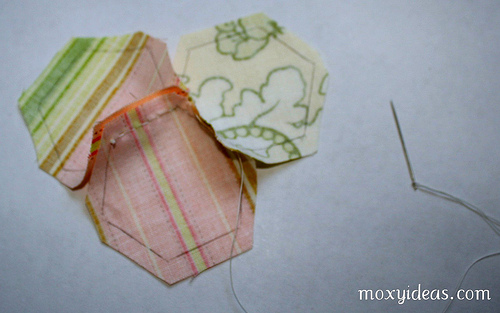
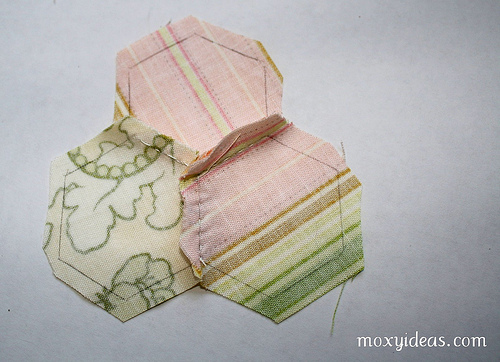
I’ve stopped at three here, but you can just keep adding more and more around, choosing where to place the next one based on where your thread left off. Here’s the back - I’ve finger pressed the seams.
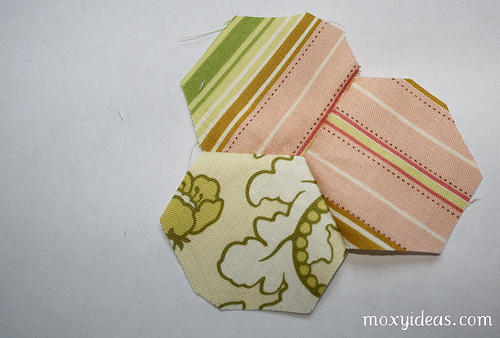
Here’s the front. Once I’ve got all the hexagons I want, I use spray starch to flatten out the seams. Eventually, I’ll also use spray starch to turn the outside edges under, and I applique my hexes down to a foundation. I guess you could just keep going and going until you make a whole quilt, but that is a little ambitious for me.
So that’s it! I hope it helps someone. Sewing these goes super fast - it took ten times as long to write this tutorial as it did to sew those hexes together. I hope you’ll link back to me with pictures of your completed projects!
i, too, am pretty interested in trying this now. of course, i have no idea what a back stitch is … and what the heck is the secret to getting a knot tied close to fabric?!
I might even try this. :) Great tutorial, thanks!
I think I would drive myself nuts if I tried that project! And yeah, I thought about joining the stash busting, but then I bought a bunch of fabric I don’t need. So, maybe I’ll start next month…
I seriously have a problem.
Hey, I noticed that you have some bicycles fabric on your Etsy. Would you be interested in trading for some chairs fabric when I actually have it in my hot little hands?? TECHNICALLY THAT ISN’T BUYING. ;)
[...] in the little papers was double the work - for me, anyway. Many people swear by it. So I made this handy tutorial for hand-piecing with no paper. I still think this method is the best for small hexagons. Then I [...]
this is great - thanks for an awesome tutorial. i’ll definitely have to try making them this way! :)
Really great job…..easy to understand clear instructions. By the way the photo’s HELP a lot.
Thanks.
Barb
Great idea! It’s funny that I first learned to quilt by piecing a pinwheel square this way; but it never dawned on me 20 years later to try it again on the hexes! All that time spent sewing those darn things to the paper could be spent sewing the actual fabrics together! Brilliant! Thanks!
thank you. I think it helps a log. hugs from Italy Alessndra
Thank you sooo much for this tutorial. I do not do anything with paper piecing, way too fiddly, so up to now I have avoided hexies. Doing them this way is so easy and so fast and personally I think they look great! I freely admit I am now addicted. I use a charm square for each which is a cheap and definitely portable!
[...] no need to use the papers at all [...]
Thanku so much for this. I remember being little and my grandad teaching me, but as im getting older now, id forgotten. Im wanting to make a memory quilt from my eldest sons shirts etc. He sadly passed away March this year. hoping it will keep me occupied. Many thanks again.
Julia x
getting ready for knee replacement and needed a project, this is a huge help! thanks
Hi!! just found your website…Love your tutorial. Since I’m working on something using hexagon, I will give a try on this technique. Thank you!
I’m using your method and I love it!!!
http://scientificseamstress.blogspot.com/2012/01/project-in-hand.html
really easy to follow this,not quite confident enough for the paperless bit but will give it a go,many thanks for the templates i have been tearing my hair out trying to find some templates that dont have to be shipped from australia or the usa.
I WONDER IF YOU COULD PRINT THE HEXIES ON THE FABRIC??
LOVE DOING THIS.
[...] Hand-Sewn Hexagon Tutorial « *Snippets and Blabbery*Feb 2, 2010 … Hand-Sewn Hexagon Tutorial. Here’s my little tutorial for hand-sewing hexagons together without using paper templates inside the hexagon. [...]
thank for template hexagones merci beaucoup.
This was so helpful! I can’t wait to get mine going.
Returning to patchwork after 40 years I love your idea of not needing paper inserts. Thanks so much for the tutorial - I’m about to give it a go!
Love this way, was looking for templates but no paper that sounds great off to start a baby quilt for my first not even conceived grand child.
I am looking at your method of sewing haxagons without paper.
thank you for the marvelous tute and the hexie sheets. shall enjoy this very much.
I just printed a template - and am already making me a pretty pink “flower” - LOVE THIS! Thank you so much for posting this …. sooo easy to follow and looks sooo pretty when done.
Thanks for the information and templates. Using scraps to make a quilt and this makes it very easy.
I’ve just printed my last sheet of templates which have been wonderful and thank you. Before I cut them up I draw an arrow across the middle horizontally as my pattern instructions told me to be sure and put them together on the same grain direction. I think this is because I am making an applique diamond shape and it might go wonky otherwise. However, I am using charm squares so for the fabric templates I did the following. Draw 4 hexagons on a piece of template plastic the same size as your charm square. Stick the plastic to fine sandpaper with spray mount (I also stick coloured paper to the sandpaper but this is just because it then looks nicer) and cut out the hexagon windows carefully with an exacto knife and a small quilt ruler. Then just put it sandpaper side down on the charm square and draw round the inside of the hexagons with a chalk pencil and you have 4 shapes to cut out and no paper to fiddle with. This of course is only useful if you HAVE to use the paper templates inside the fabric shape.
If I ever make these again and I swore I never would even once, I will definitely use this Moxy Method again.
Thanks for the pattern and the ‘paperless’ piecing tutorial!
Thanks for the templete and turiol will let you know how it goes
Hi there, thank you for allowing free hexagon template download. I have, this morning found the half hex ruler which makes hexagon patchwork so much easier.
I found it demonstrated on UTube and you can purchase the ruler at http://www.missouriquilt.com
Happy sewing, Julie, Rotorua, New Zealand
Hello There!
I totally love your new thoughts on Hand-Sewn Hexagon Tutorial ? *Snippets and Blabbery* and I will be back again.
. Thank you!
Yes, with inklingo you can print multiple different shapes on your fabric with an ordinary ink jet printer.She has a multitude of differnt patterns and support is always right there. I am doing inklingo for other quilts and the EPP for my little charm hexagons. The inklingo is just as portable and very satisfying. LOVE her site - lots of ideas and differnt colorings, etc. http://www.Inklingo.com


Well done, Abi! I think even I would like to do this, now that I’ve seen your method. Thanks!