Bee Happy blabbery Crafts denyse schmidt flickr sewing: anna maria horner diaper bag fabric handmade handmade beginnings here we go bag reverse applique sewing circles virtual bee
by Blabby
leave a comment
Only 3 months to go!
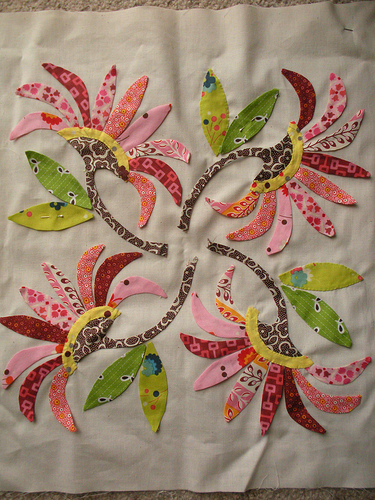
Is it sad for me to celebrate the fact that I’m only 3 months behind on my virtual bee? I finished up two blocks this weekend, so now, I only have Jan, Feb and March to finish! Here are Oct and Nov’s blocks…those girls were so patient! (Thanks, Rosanna and Natalie!)
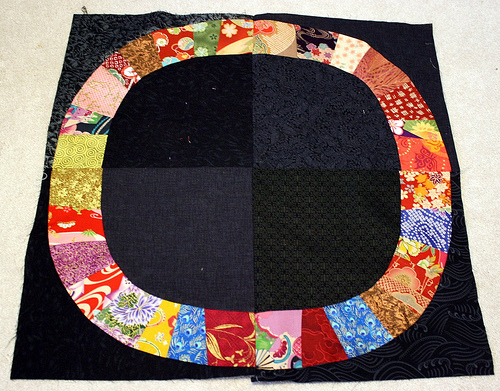
For Nov, Rosanna had us do a big Single Girl block. I’ve owned this pattern since Denyse published it, but as soon as I opened it up, I knew I would never make it. Denyse uses templates in a lot of her patterns where I don’t feel like templates are so necessary. Look at me - questioning the methods of Denyse Schmidt! But really, I love her quilts so much, I’m just too lazy to put the effort into them that the patterns call for. I guess that’s why they sell for so much money!
So anywhoo…Rosanna cut ALL THE PIECES! She sent us these nice little packages of all the little shapes that make one ring. I can’t imagine the time she spent preparing those packages. All I know is that I got to do the fairly simple sewing on this awesome block without doing any of the mundane or tedious pattern tracing and cutting. So thanks, Rosanna! Taking this pattern out for a spin showed me that it’s not the big, awful pain I thought it would be. And if I cut multiple pieces (stacked fabric, cut four or five at a time), I could almost see making a quilt with it. The finished block was huge, so six would make a great baby quilt.
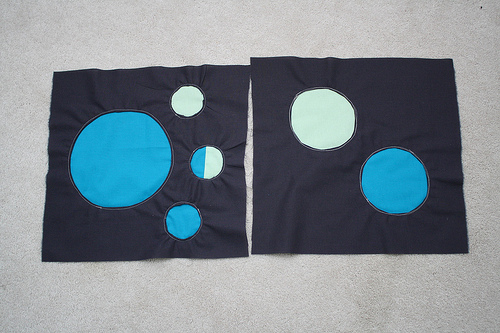
And then for Nov., Natalie wanted porthole blocks. This was a fun new technique for me. Although, I never could get my seams as smooth as I wanted. We used Ric Rac’s tutorial - which is super easy. I’m sure I’ll use this technique again - and really, you could do any shape.
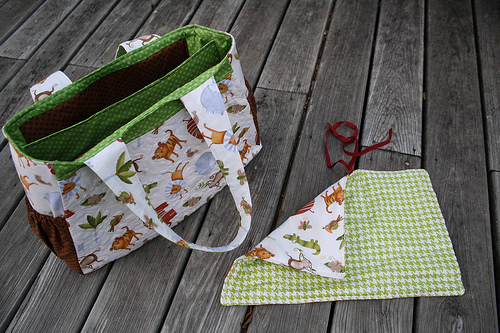
In other sewing news, I finished up the Here We Go bag for my aunt Jamie. Using the pattern in Anna Maria Horner’s book Handmade Beginnings - Jamie picked her own fabrics, and I put together this GIANT diaper bag. Pretty easy pattern, and the technique used for closing up the top and sewing the inside and outside together was suprisingly easy. I normally make bags using the ‘birthing’ method - where you flip the whole bag right-side-out through a small hole in the bottom. This bag uses a bias strip sewn around the whole top like quilt binding. I ended up hand-stitching it down, just like I would do a quilt. Not bad at all.
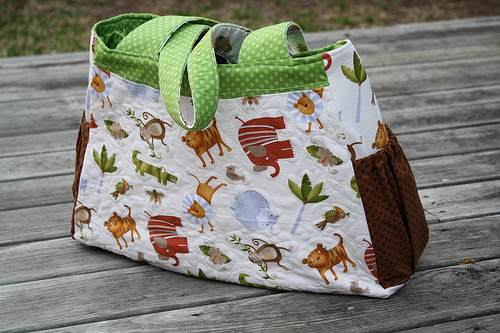
The bag has a center divider with pockets on both sides and pockets around the inside lining. There’s also a little elastic loop that holds the changing pad.
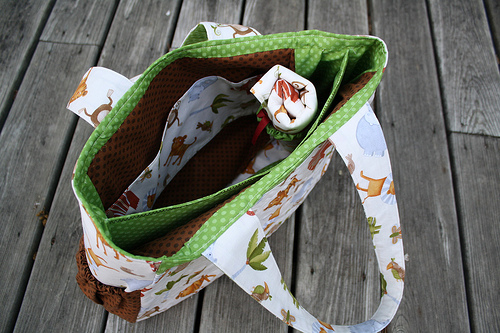
And I found a great laminated herringbone fabric on fabric.com - perfect for the changing pad. Although, I really need to get one of those slippery feet for sewing on vinyl and stuff…what a pain in the neck!
Bee Happy blabbery books flickr quilting patterns sewing: boo davis elizabeth hartman january modern quilt guild national blood donor month oh fransson project modern
by Blabby
leave a comment
TGIF!
I think Friday is my favorite day of the week. The feeling of joy I get at about 6 pm on a Friday is unmatched by anything else these days.
That was a little bleak.
So anyway, it’s blood donor month. Did you know that? One donation can help up to 3 people! I’ve got my appointment tomorrow morning at 9:45 am. I love having a donor center right around the corner!
 I got two new sewing books burning a hole in my metaphorical sewing pocket. Did I blog about these already? My blogging has been so intermittent…anyway, I’m super excited about them. First off is Elizabeth Hartman’s Practical Guild to Patchwork. Of course, there’s already a big Oh

Fransson group on Flickr - check out some of the projects! Besides the great quilts in her book, I also want to give mod mosaic a try. How cute is that? And everyone posting their pictures say it’s really easy.
My other new book is Dare to Be Square by Boo Davis. Super cute projects - especially the robot. And the weiner dog. Her patterns are totally unique. I love straight lines - she’s got such a fun mix of quilts in this book. AND, she’s a totally awesome illustrator. Check it.
So that’s what I’ll be working on in the near future. That and my outstanding bee blocks and some sweet baby gifts for my new cousin Jackson due in Feb.
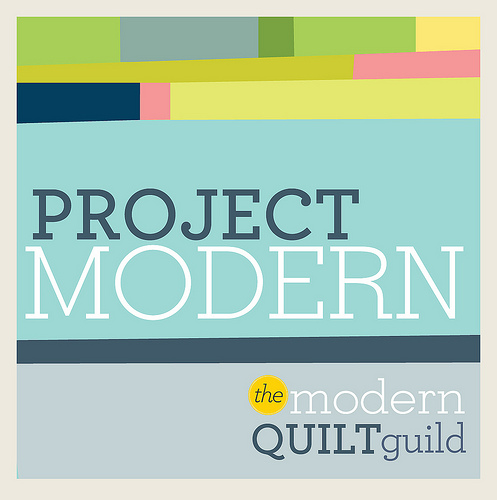
Oh! And I almost forgot! I’m going to do Project Modern Challenge #2. I’ve been doing some sketches, but I’m not quite to the sharing stage. Thanks to the awesome Modern Quilt Guild for setting it up! Look at all the super awesome entries from Project Modern: Challenge #1!
Have a great weekend!
blabbery Crafts fabric flickr gems on the web quilting sewing: ikea sew mama sew
by Blabby
3 comments
Gems on the Web
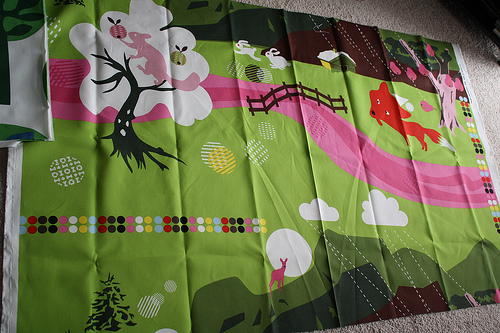
How awesome is this fabric? It’s home dec weight canvas from Ikea. This is a one yard cut - the fox is huge! And so perfect :)
New to quilting? Check out this fun little pdf download over at Sew,Mama,Sew! It’s a Quiltalogue, a printable mini-book of quilting terms. How handy!
Need some more inspiration to get sewing? If you didn’t get your fill browsing the Quilts of the Day on Sew, Mama, Sew!, check out my new favorite group on Flickr: { Handsome } Hexies.
Or how about Elizabeth’s new potholders?
Seriously. So much inspiration everywhere!
blabbery flickr quilting patterns sewing tutorials: hexagons
by Blabby
14 comments
Hand-Sewn Hexagon Tutorial
Here’s my little tutorial for hand-sewing hexagons together without using paper templates inside the hexagon.
First, download the hexagon template you want to use. Cut out your shape - you really only need one or two. (I made the template sheets for people who need lots for English paper-piecing). You can pre-cut your fabric into squares a little larger than your template (at least a 1/2″ on all sides), or just keep your fabric whole. Trace your shape. A lot!
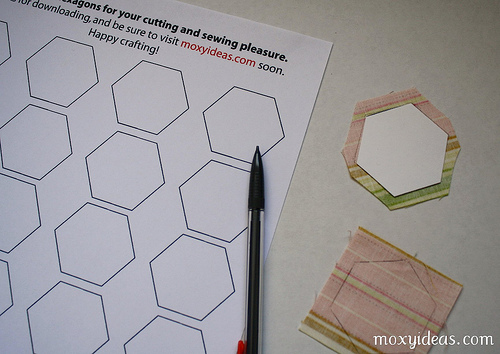
Cut out your hexagons, leaving a good 1/4″ seam allowance all the way around.
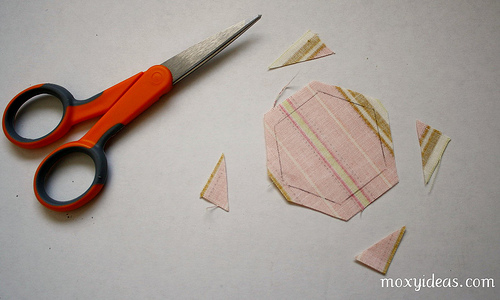
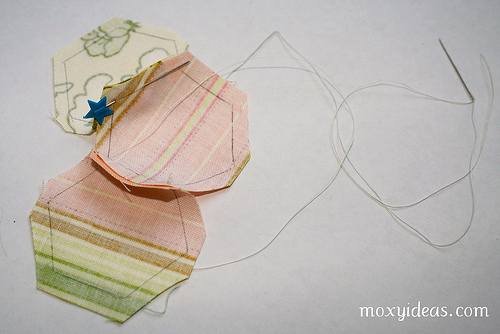
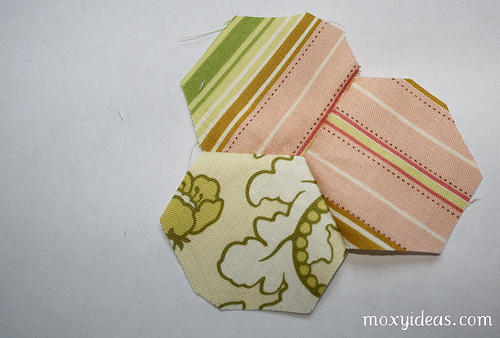
Place two trimmed hexagons right sides together and stick pins through two corners. Don’t worry about your outer edges lining up, just get your pencil lines to match. Two pins - one at each end of one side of the hexes - is the easiest way to get a good match.
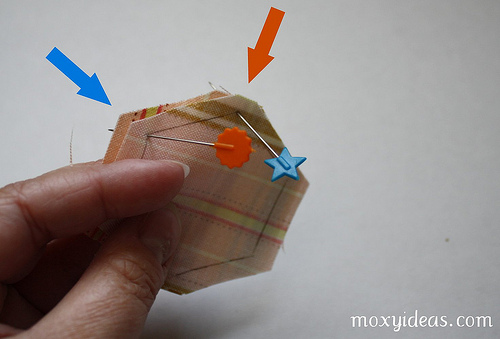
Stick your pins in along the lines away from where you’re going to sew so they’re out of your way. Thread your needle, and put a knot in one end. Use the knot to anchor one more corner together - this will be your starting point. I like to start and stop with a tiny back stitch at each corner when sewing these hexes together, just to make the intersections stronger.
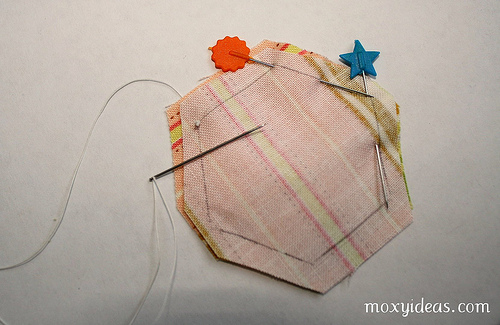
Pushing your needle up and down in a running stitch, sew right along your pencil lines.
As you get to the end of your side, remove the pin to get it out of your way. Sew your running stitch all the way to the next corner. Once there, sew a small back stitch to secure the corner. Be careful not to pull your thread tight - it will gather your hexes. You’ll have to continually loosen the fabric back to a nice flat seam.
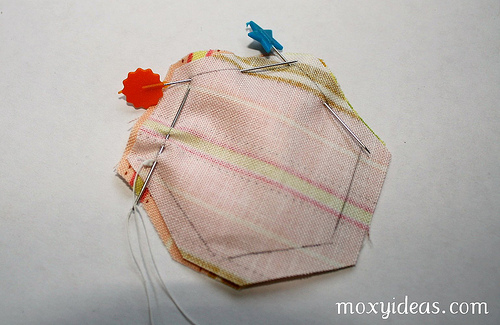
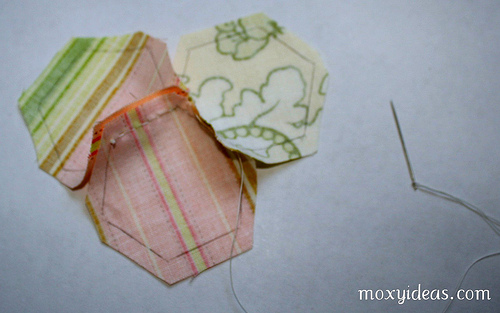
Now you’re ready for a third hexagon. You can add it anywhere, but for this tutorial, I just kept moving to the right. Open your first two hexes and line your third hex up right sides together with your second hex. Use a pin in the corner to keep them lined up.
After a quick back stitch through the second and third hex, to both join them and secure the intersection, continue your running stitch to the next corner.

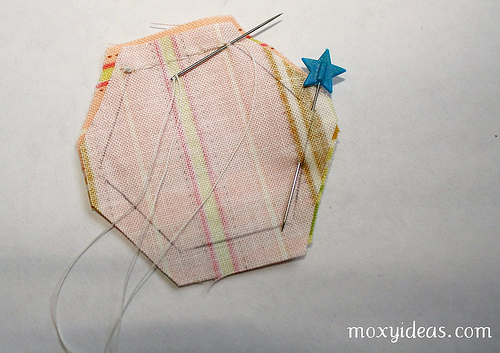
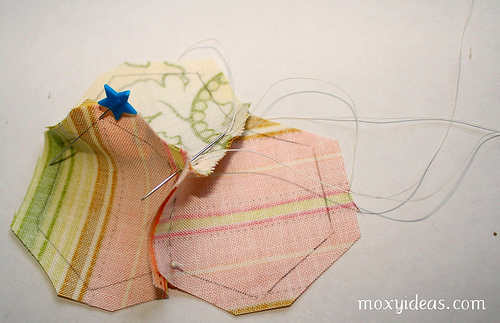
Now you’re at the far right side, and you need to get back to sew hexes one and three together. You can do a back stitch and tie a small knot and cut your thread, or you can do a back stitch and sew a few stitches to run the thread back to the center. I do the latter…it may be laziness, but I try to see how far I can get without ever cutting the thread.
Use the same method of lining up hex one and three, right sides together, and securing the outside corners with a pin. Sew with a running stitch toward your pin.
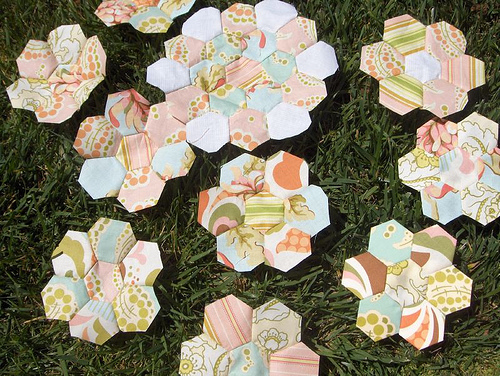
I’ve stopped at three here, but you can just keep adding more and more around, choosing where to place the next one based on where your thread left off. Here’s the back - I’ve finger pressed the seams.
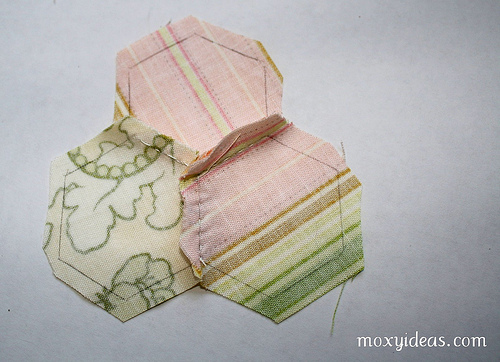
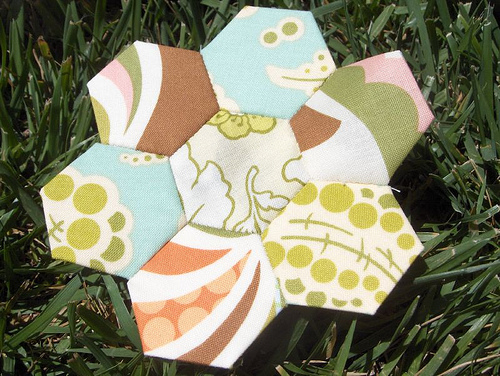
Here’s the front. Once I’ve got all the hexagons I want, I use spray starch to flatten out the seams. Eventually, I’ll also use spray starch to turn the outside edges under, and I applique my hexes down to a foundation. I guess you could just keep going and going until you make a whole quilt, but that is a little ambitious for me.
So that’s it! I hope it helps someone. Sewing these goes super fast - it took ten times as long to write this tutorial as it did to sew those hexes together. I hope you’ll link back to me with pictures of your completed projects!
blabbery flickr quilting sewing: english paper piecing hexagons templates
by Blabby
2 comments
revisiting hexagons
After seeing this super cute picture on flickr and reading her comment about her whip stitches showing, it reminded me that I wanted to revisit the topic of english paper piecing verses simply sewing your hexagons together.
I’ve had hexagon templates available for download on here for a while now. I recently added a couple more sizes. I also added some triangles, but then realized that someone had requested diamonds, not triangles, so I’ll be redoing those :) But the triangles might be fun too - who knows?
ANYWHOO…here’s what I wanted to talk about. After I went through all the trouble (actually, not much trouble at all) of making those templates, printing them, cutting them all out, sewing a bunch into fabric squares using Sunshine Creation’s awesome tutorial, I found that although it was very neat (as in precise, not neat-o), it was too double-the-work for my taste. And when I went to sew together my perfectly neat little hexes with their papers inside, I could not hide the joining stitches, no matter how small my stitch, no matter what thread.
Finally, I ended up just tracing the hexes onto the wrong side of my fabric. I pin them together and and sew along my pencil lines using a running stitch. Super fast and easy. I think I’ll do a tutorial of my own. Maybe tomorrow…with pictures!
The back is a lot messier, but if you use a little Best Press or something, they’ll press right down.
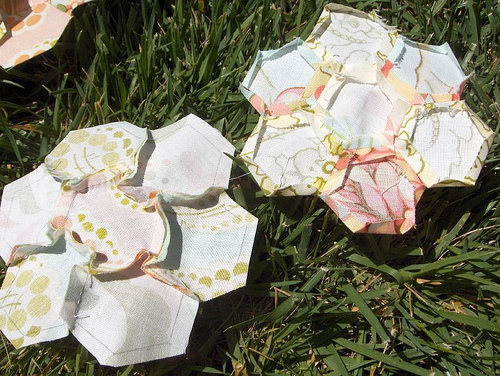
Hexagons are so fun and come out so cute, but the papers inside is so much EXTRA work (to me.) Once it’s all said and done, I don’t think you can tell the difference. The picture at the top has one english paper-pieced flower - you can tell because it’s edges are turned under (bottom right corner). Here it is below and I think you can really see the stitches, which is annoying. The last picture shows the differences in the backs before pressing. But again, I used a little Best Press, and had no trouble getting those seams to lay flat.
I feel so cool!

mine

kerry's
I was wandering through all the lovely quilts on Flickr, one of my favorite pastimes, and I ran across a gallery with one of my quilts and another quilt that looks a lot like mine. Kerry over at Freckled Beauties made her lovely strip quilt based on MY DESIGN! Woo hoo!
Here are her blog posts about it with lots of pictures. I particularly like her use of bigger white pieces in the middle - they show up a lot better than on mine.
I was thinking how cool it is that we can share patterns from different countries (she’s in Canada), and how sewing - like anything that brings people together - makes the world so small. It was a thrill to see my design being created by another quilt maker. Maybe I should write down the pattern :)
blabbery Crafts flickr quilting sewing so you think you can dance TV: sewing TV
by Blabby
3 comments
Finales
Anyone else sad to see the TV seasons ending? I’m going to have to start getting creative if I hope to find TV to fill the empty hours left by the lack of prime time. I especially enjoyed Fringe and Dollhouse this season…I hope hope hope they come back! I also loved watching the craziness of Coach on Survivor. What a kook. Very entertaining. I think we’ve still got some finales to go, right? Private Practice? Brothers and Sisters? We’ll see what they come up with. I’m happy that the cable networks offset their seasons…In Plain Sight is back, and I love it. Looking forward to The Closer next month. And of course, SYTYCD starts soon!!! Woo hoo!!!
I’ve been getting more comments from people who have downloaded my hex templates. (Thanks, Ida and Susan!) I hope they’re helpful! I love to hear that people found just what they were searching for at my little home on the web :) I need to add something new to the free download page, don’t I? Maybe an embroidery pattern…I’ll work on it.
I got a little sewing done last weekend. I finished up my contribution of pinwheels that will make the border around our little dresses quilt. I forgot to take a picture of my second little dress, my friend Pauline posted this photo on facebook, and I “borrowed” it. Thanks, Pauline! My blocks are the plaid dress (2nd row, 3rd dress) and the lavender dress (3rd row, 4th dress).
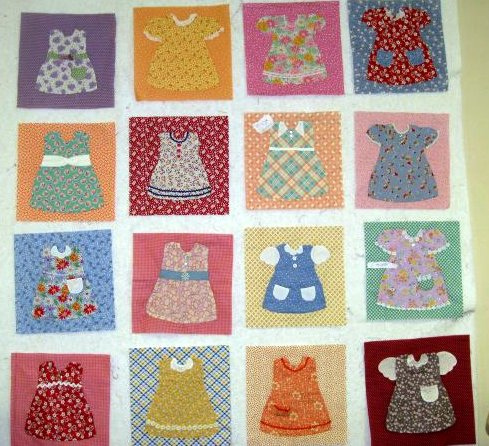
And here are my pinwheels…everyone is making six using scraps from our dresses.
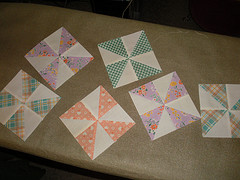
I won’t lie…I did not find making pinwheels very fun. My centers are really bumpy…Lynn, our fab group member and long-armer will probably be cursing me when she goes to quilt these.
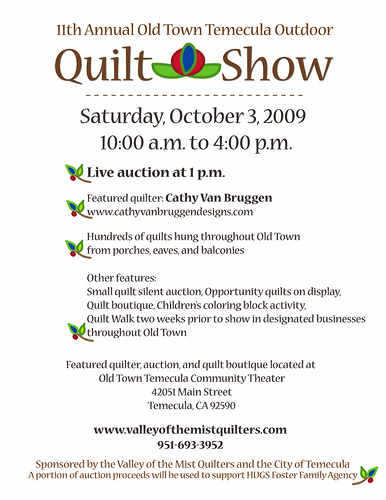
I also finished up my first draft of the flier for our quilt show. I drew the little applique flowers in Illustrator…my first attempt at creating new images, rather than using stock images. I am happy with the outcome. BUT, I haven’t gotten any feedback yet, so it might not fly. Last year’s flier was a lot more elaborate, but I never liked it. I thought it was way to busy. We’ll see if this one makes the grade…
In other news, William got a light saber…that was fun for five minutes. And we redid the train table yesterday…almost two hours of assembling and reassembling what must be yards of track pieces and buildings. But he’s playing quietly in there now, so it was well worth all the trouble. Have a great week, everyone!

blabbery Crafts featured flickr sewing: applique aranzi aronzo craft books fabric heather ross hiking trails material obsession piece o' cake santa rosa plateau sewing weekend sewing
by Blabby
3 comments
toddler sports and sewing
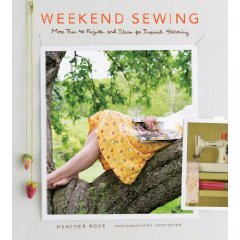
We’ve been a whirlwind of activity around here. From 3-year old sports classes every day, to a possible impending move, there’s hardly been time to sew! That’s not to say I haven’t been preparing to sew. Which means buying stuff - fabric and books! Here are my newest books…all of which I’m dying to dig into. There are at least 3 projects in all of them that I love.
The third book is a new Aranzi Aronzo book called Cute Stuff for Babies. There are the cutest little appliques in there. My favorite pattern is a bottle holder pouch in the shape of a little quilted bottle. Oh, and the little diaper covers with a bear and bunny face on the baby’s booty. Awesome.
I did finish a couple bow tucks bags. Well, I finished one and one is almost done.
And did I post this already? I’ve just been working on hand sewing all the bit down since I really haven’t had time to sew.
We’ve also been spending time at this lovely place:
addictions Crafts family flickr sewing: 2 year olds bags box bag box bag pattern craft blogs dopp kit flickr kid language sewing sewing tutorial toddler tutorial
by Blabby
leave a comment
More great tutorials!
Seriously, there just isn’t enough time in the day to sew all the things I want to sew. I’ve been admiring these box bags (which my husband calls dopp kits) by splityarn for some time, but couldn’t wrap my mind around the ends. Then I found this AWESOME tutorial by drago[knit]fly. THANK YOU!
In other news, my adorable kid has made up his own language. In the car today, he’d say “what’s red?” and I’d say “roja”…we were working on Spanish. Then he says, “what’s mooshkin?” and then he cracks up. He’s got a whole list of such words. Here are a few: mooshkin, monkshin, bosh, spoosh, bonkshin, maupshin, maups, faumps…I’m guessing on the spelling here. I really think only bosh and spoosh have meanings - which is basically when he does a power ranger move on something. All the rest are purely for silliness sake. I happen to love those words. They make my monkshin faumps!
Crafts featured flickr live green quilting sewing shopping: 2008 holidays christmas cloth napkins Crafts gift guide green handmade holiday sewing sustainable sustainable holidays
by Blabby
2 comments
holiday spirit
I’m working hard on Christmas gifts. I’m trying to avoid the last minute purchasing spree because all the crafts I had planned never got made. So, so far, I’ve completed two quilt tops, one back and binding - ready to be sandwiched, one waiting to be ironed.
I’ve also finished cloth napkins for everyone. These are about 8″ x 10″ - one fat quarter makes two. I’ve got enough here for six different families :) This is one part of my “green” Christmas, where everyone gets a reusable grocery bag and cloth napkins. And maybe something else - but I haven’t decided what yet. Any ideas? Here are my napkins:
Thanks to Unspeakable Visions for providing this fun naughty and nice list for planning gifts. I love it! Also, thanks to the Handmade Holiday 2008 group on flickr for keeping me honest and inspired. I do still plan to give a few Oxfam gifts this year though - if you haven’t been on Oxfam America Unwrapped, you should check it out. Lots of great gift ideas - especially for people who have everything!
Just a note about those cloth napkins. I instituted them at my own house about six months ago, and I thought they might be a pain, but actually, they’re awesome. First of all, I love to use them - they get softer and softer with each wash because they’re made of good quilting cotton. Second, they make me feel fancy, even when I’m eating ramen. Third, we have been using the same roll of paper towels for about 4 months now - and it’s still over half full! When they’re dirty, I set them on the washing machine, and they just get thrown in with whatever load I’m doing. If they get too stained with spaghetti sauce or whatever, I’ll just make some new ones, but so far, they are perfect. I highly recommend them for everyone! Reduce - Reuse - Recycle!