blabbery books: audiobook awesome books ernest cline geekery ready player one sci fi summer read Wil Wheaton
by Blabby
leave a comment
Summer Reading: Ready Player One
 I just finished Ready Player One by Ernest Cline and I’m giving it 5 stars out of 5. I listened to the unabridged audiobook, narrated by Wil Wheaton.
Here are the pros - it’s a wonderfully creative 80′s nerd fest and I loved almost every minute of it. I’m proud to say I think I understood most of the pop culture references, and got a particularly geeky thrill whenever the book mentioned Star Trek TNG, because I was picturing Wesley Crusher doing all the talking anyway.
If you have any interest in the 80′s (especially TV, movies and music), sci fi, gaming, role-playing games, computers…(Cline covers a lot of ground), I think you’ll love this. I don’t even really know or care about gaming, role-playing games, etc., and I was pretty young for most of the 80′s, but I still loved all of it.
Find the premise and lots of rave reviews here or here. I highly recommend this for a fun summer read. There’s even a little love story in it - which was my favorite part. Truly something for every reader - male or female. Excellent book, Mr. Cline! And excellent narration, Mr. Wheaton!
**audiobook-specific side note** If I had to give it a con, and it would only apply to the audiobook, it would be that there are a lot of LISTS (top 10 scorers, lists of computers, lists of games, etc.). This probably comes off much cooler in the actual book. I happened to listen to the audiobook, so the lists got a little crazy. If I had been reading the regular book, I would have skimmed.
blabbery: amctv.com free printables houseparty.com mad men mad men masks
by Blabby
3 comments
Mad Men House Party!
![]()
I’ll be hosting a Mad Men Premiere House Party right here on Snippets and Blabbery. Join us March 25 at 7 pm CT for drinks and socializing, and season five kicks of at 8 pm CT.
To get the fun started, head over to Netflix. Seasons 1-4 are streaming now on Watch Instantly. I plan on boning up to refresh my memory and help me get all the lies and secrets straight in my head.
Then head over to AMCTV.com for some fun drink recipes in the cocktail guide - I’m getting the party started with a Pink Squirrel!
Test your knowledge with a Mad Men trivia quiz, or print out your favorite character’s head for a fun Mad Men character masks. (Those pdfs are also in the sidebar).


Can’t wait to “see” you! Please join the party by adding your link below. We’ll all party it up on our blogs. Or, just leave a comment - I’d love to see some pictures or your favorite cocktail recipe!
Update: I had to close the link party - too full of spammers. But I’d still love it if you’d leave a comment to your own blog for your Mad Men Party.
blabbery fabric flickr sewing: pillow case dress sewing for kids
by Blabby
2 comments
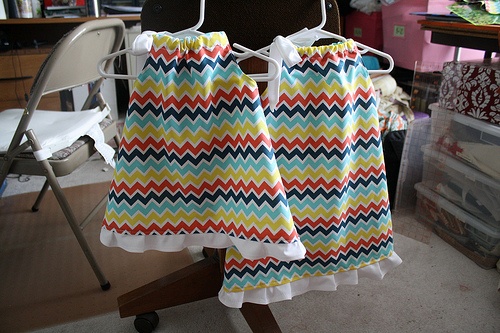
pillow case dresses and matching t’s
I got to do some sewing this weekend (thanks, honey!). My neighbor has four of the cutest kids you’ve ever seen - two boys, two girls. She asked me if I could make them some coordinating outfits for a picture, and mentioned pillow case dresses she’s seen all over the interwebs.
I looked all around at the MANY pillow case dress tutorials (what did we ever do before the internet?) and found two that I kind of squashed together. For the basic shape/pattern size, I used this one from prudentbaby.com. For the arm holes and the ruffle, I used this one from CraftSnob.com.
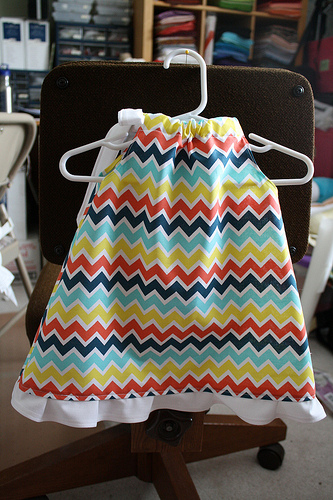
I actually ended up not doing the ruffle using her gathering technique, because I pulled too hard and snapped my thread mid-gather. So I ended up folding a quarter inch on my ruffle strip every two inches and pinning a lot.
I also went ahead and made my own tie string/double binding strip for all the dresses using 3″ by length-of-fabric (selvedge to selvedge) folding each long edge in, and folding the whole thing in half. This way, I could match my ruffle and tie strap without going to the fabric store. Not that that would be a hardship.
I have seen another gathering technique where you lay a piece of thread down on the length of whatever you’re sewing, and then sew a zig zag over it, creating a kind of casing for your gathering thread - that’s worked better for me personally in the past. Also, I’ve seen sewing machines that come with a gathering foot! That would be awesome.
Anyway, for the two sweet boys, I made t-shirts with tie appliques in the matching chevron fabrom. I got the template fro the ties from here at CrapIveMade.com.
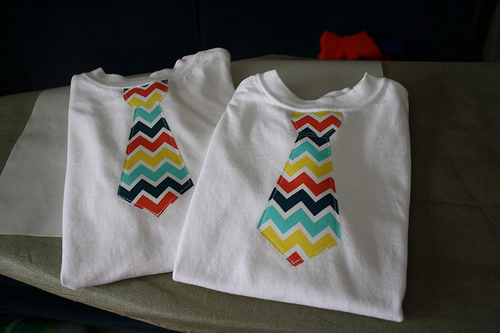
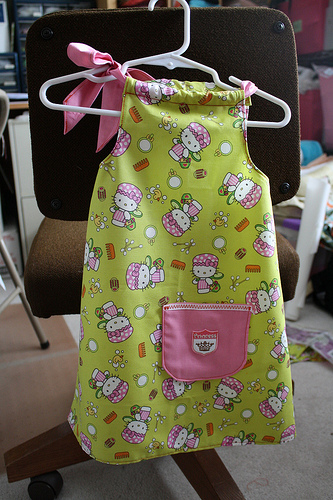
The whole deal, including my rough draft Hello Kitty dress (below), took about 5 hours - most of which was ironing and stiching seams (arm holes, dress bottoms, ruffle strips, binding piece for bows.) The t-shirts took about 15 minutes total.
In my excitement…
In my excitement to put a button about QuiltCon on my blog, I somehow have deleted half my sidebar. BUMMER. Anyway, look what’s coming…to Austin!

Be there or be square! Very, very exciting news.
New sidebar coming soon.
So pretty

IMG_3874, originally uploaded by Beaty Family Fun.
I’m pretty sure our plants are all confused around here…my hibiscus are still budding, the trees are just now losing their leaves. Warm winters make for crazy plant life! But we’re enjoying all the color.
Micah’s quilt
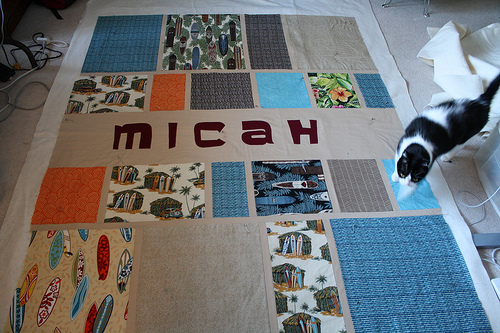
Micah’s quilt, originally uploaded by Beaty Family Fun.
Both nephew quilts are quilted. Nathaniel’s binding is almost done, and Micah’s is next! My original post about how I came up with this pattern is here.
Surfer Dude Quilt
Katie over at Katie’s Corner made this super cool Super Hero Quilt. So I started making my plan based on her photo.
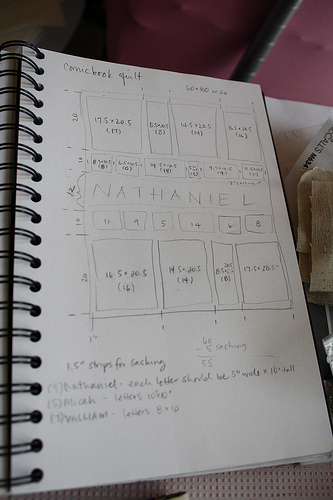
Here are my initial sketches and measurements. I decided that I wanted the quilt to be about 60″x80″, and worked in from there.
I knew I wanted to make one for each of my nephews with a surfer theme. Then, for the backs, I used their favorite team colors (FSU and UF). Here are the fabrics I picked out for the surfer side. I’ve been collecting surf-themed fabrics for a while, so I had everything I needed. I have some awesome hula girl fabric too, but I left that out because they’re still a little young.
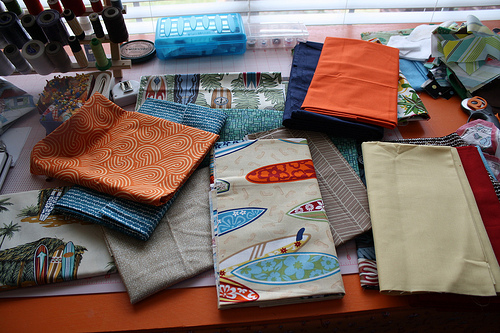
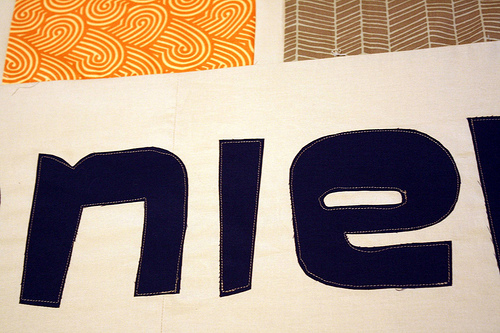
I pieced all the top and bottom strips, and next it was time to do the name applique. So I printed BIG letters in ‘mirror-image’ format on my printer.
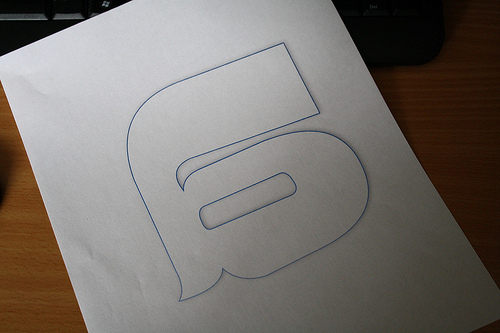
Then I traced them onto the paper side of Heat-n-Bond Lite. Then I cut each letter out and ironed the glue side to the back of my fabric. Then I cut them out from the fabric and peeled the paper backs off and glued them down to my kona khaki piece that would go into the quilt. I just kind of eye-balled the spacing.
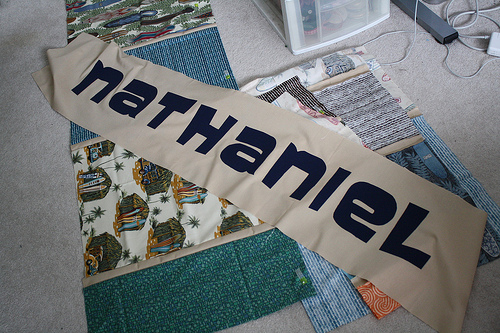
Then I just did a straight stitch around them about 1/4″ inside the edge. I tried a couple different stitches - zig zag, satin, but they didn’t look that great. The straight stitch looked great and was fast.
And here’s the completed top!
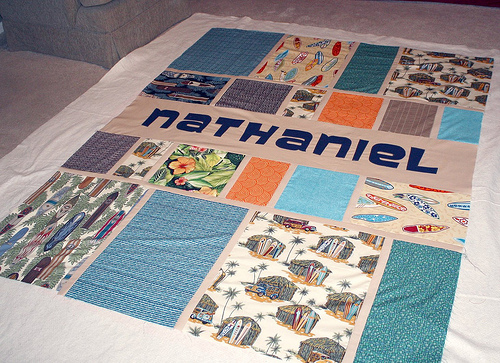
The backs are all done and Nathaniel’s is sandwiched. I’ll post some pics of the completed quilts soon. These were supposed to be Christmas gifts, but now they’re early January gifts :)
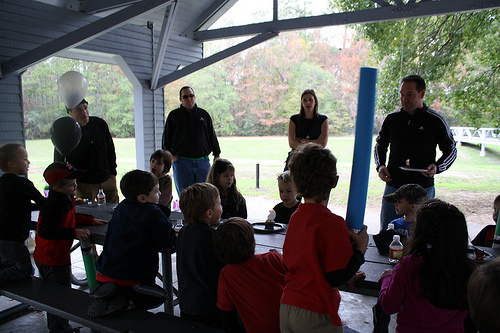
blabbery: birthday boy handmade kid light saber party starwars
by Blabby
6 comments
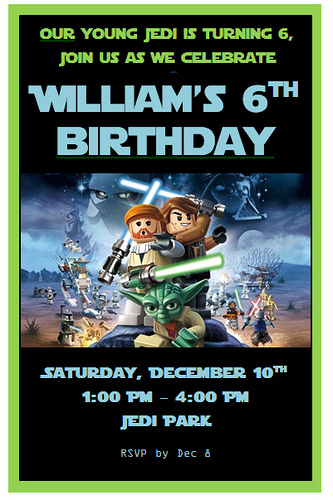
Jedi Party
We had a very successful birthday party last weekend. Here are some photo highlights.
Invites made in MS Word using a free star wars font and bootlegged star wars lego images found all over internet.
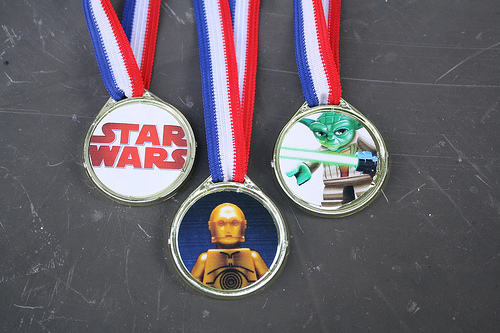
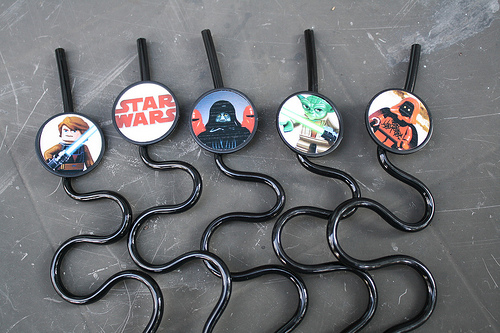
For the goody bags - medals and silly straws from party city with star wars stickers (avery labels printed on my printer, circles punched with a paper punch):
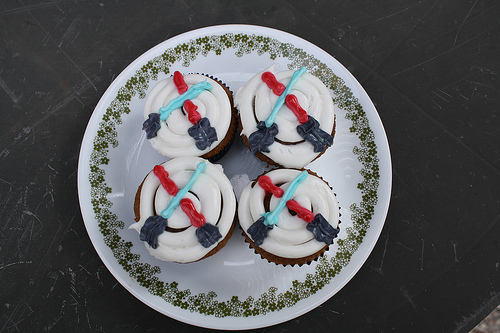
Homemade light saber cupcakes:
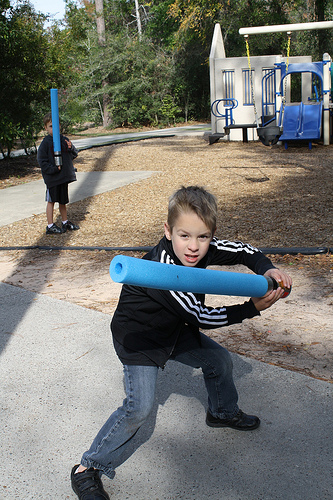
Pool noodle light sabers for everyone:
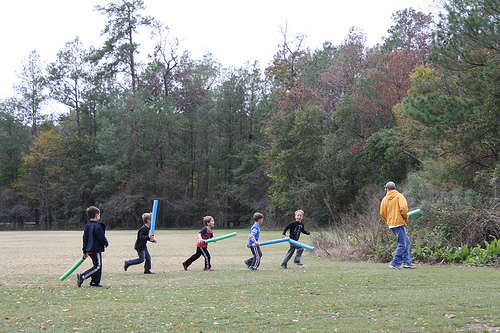
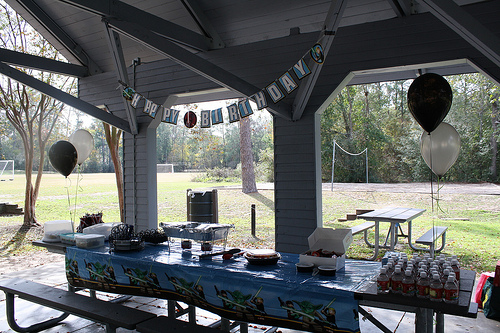
Best of all: LOTS of friends! I hope everyone else had as much fun as we did!
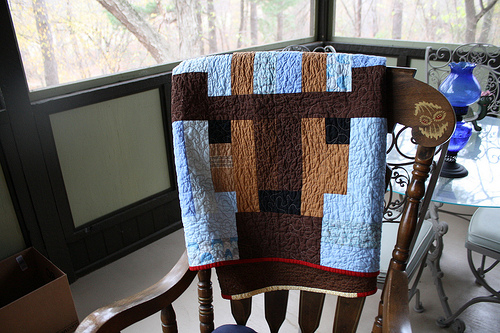
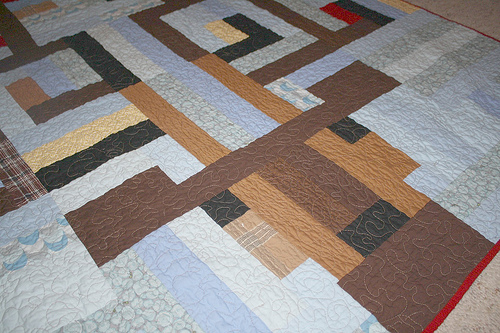
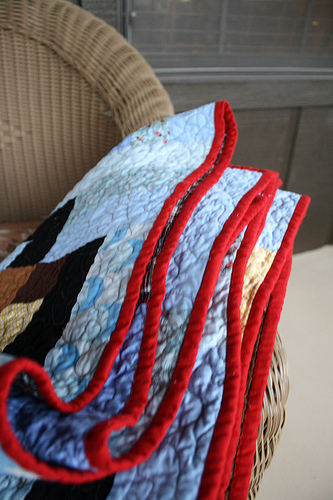
blabbery moxywares quilting quilting patterns sewing: boo davis dare to be square deer modern
by Blabby
leave a comment
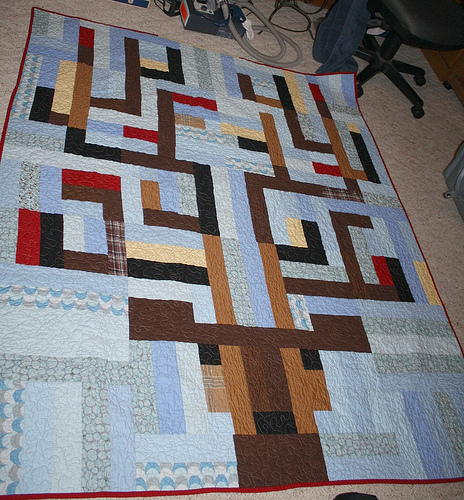
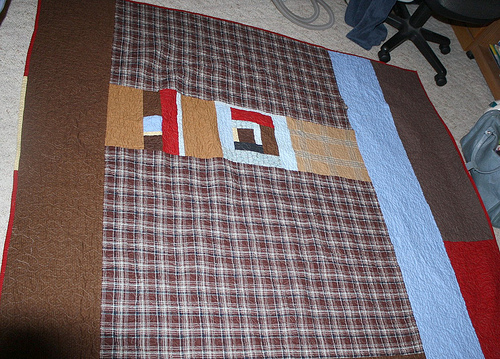
Deer Quilt Complete
This quilt was for my dad’s neighbor who helped build the screened-in porch. When I started it (about 5 months ago) I didn’t realize how Christmasy it was! Now I wish I had made the deer’s nose red. I hope he liked it!
It’s made from a pattern in Dare to Be Square Quilting by Boo Davis. The fabrics are mostly Kona solids with some random blue prints (Lizzy House, Jay McCarrol) and some random plaids. I also got a yard of the brown plaid print for the back from Joanns.
Teacher Gifts
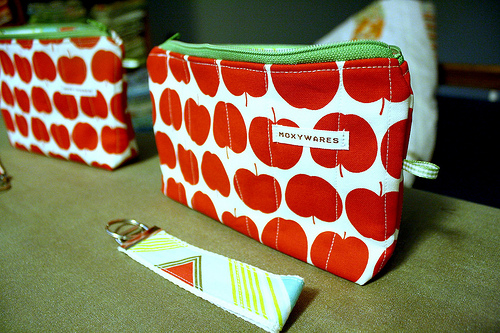
IMG_3620, originally uploaded by Beaty Family Fun.
Zipper pouches and matching key fobs (they match the lining) for the teachers Christmas gifts. Still working on the cup sleeves and a starbucks card for each :)